Privacy is something talked about a lot the last several years. From personal information, financial information or any other sensitive information. It is important to protect it for everyone. With HIPAA it takes privacy a step further and protects health information. Sitecore a few years ago announced that XM Cloud/SitecoreAI is HIPAA ready.
In this blog I will explore why HIPAA compliance important. How Sitecore can support healthcare organizations in meeting those requirements. Finally why compliance should be viewed as a responsibility rather than simply a feature of any technology platform.
What is HIPAA?
Doing a search on the web I found: “HIPAA stands for the Health Insurance Portability and Accountability Act, a U.S. law enacted in 1996 that establishes national standards for protecting sensitive health information and ensuring patient privacy.”. In essence this covers a wide range of the healthcare industry such as doctor visits, claims, medical records etc… If you know someone in the health industry you know how important the HIPAA rules are to follow.
Common Misconception
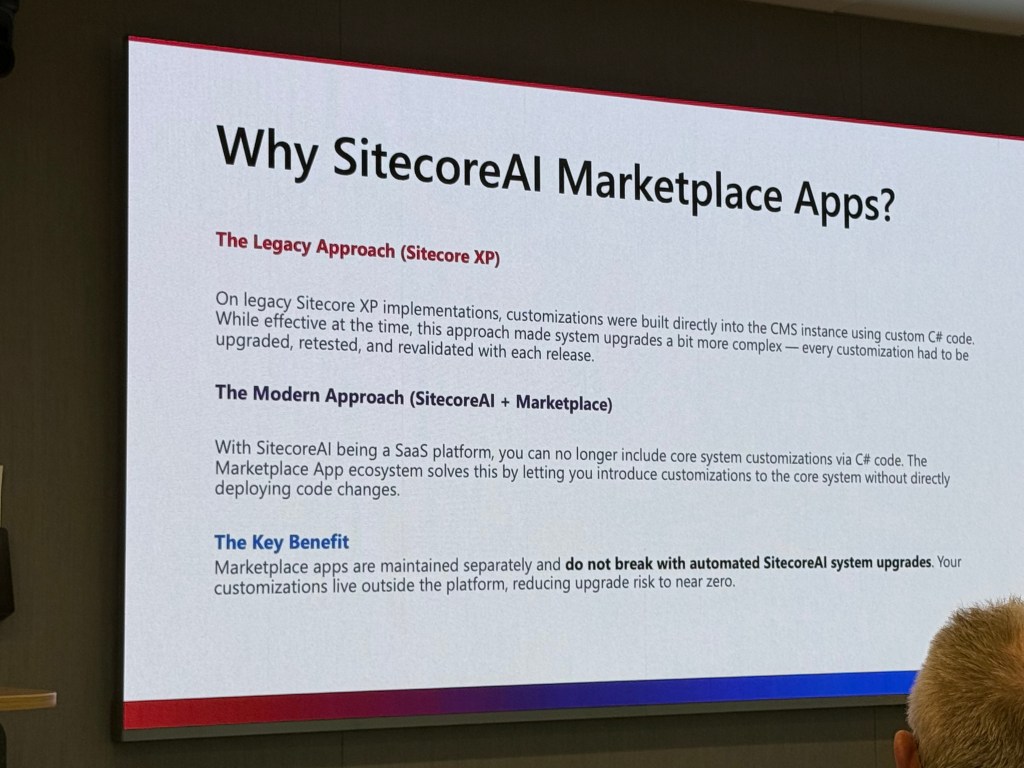
A common misconception is that a HIPAA compliant framework automatically makes an organization HIPAA compliant. Sitecore provides the tools and safeguards needed to support compliance. Organizations must still implement and manage the platform to meet HIPAA requirements.
How Sitecore Supports HIPAA Compliance
Encryption – All protected health information is encrypted during transmission. When stored using techniques like AES-256.
Roles Based Access Control – This is pretty standard in Sitecore and should be configured for all organizations. Access roles are critical in making sure only allowed users have access.
Audit Logging – Sitecore contains audits logging capturing any important audit trails.
Flexible Architecture – Sitecore is flexible and most people know. This allows creation of digital experience while complying with HIPAA regulations.
Regular Updates – Sitecore regularly releases security and platform updates that help organizations maintain a secure environment and address emerging threats.
HIPAA Compliance Considerations
Third Party Integrations – Any APIs or inserted scripting needs to be checked to make sure it does not violate any HIPAA compliance.
Analytics Platforms – Should be tested for HIPAA Compliance.
Storage of any PHI Data – Should be check to make sure if it is stored it is HIPAA Compliant.
Shared Responsibility
As you can see it is a shared responsibility to make sure sites are HIPAA compliant. The organization, hosting, implementation partner etc… should all validate the site for compliance. When the site is implemented it should be checked consistently to make sure it is still compliant.
Closing
Sitecore provides healthcare organizations with the capabilities needed to support HIPAA compliant digital experiences. However, HIPAA compliance is not achieved through technology alone. It requires the right combination of governance, processes, people and platform capabilities working together.
One of Sitecore’s strengths is its flexibility, allowing organizations to configure solutions that align with their security, privacy, and compliance requirements. As organizations continue to adopt modern capabilities such as SitecoreAI, it becomes even more important to understand how patient data is managed, accessed, and protected.
Ultimately, HIPAA compliance is a shared responsibility among the healthcare organization, implementation partners, content authors, administrators and technology teams responsible for the platform.
To learn more about Sitecore’s HIPAA readiness and compliance capabilities, click here.
This is going to be a little different blog. I hope though it will help a lot of people who might be in my former situation.
I was back on the job market unexpectedly. Last time I looked around five years ago, as soon as I started looking it was a frenzy of interviews and offers within a week. This time around there was a lot of uncertainty. My thinking had to change how I looked for a new position. This certainly was not a great market to be looking. However I found several things that worked so I hope someone can use this as a guide. I targeted a Sitecore position, but this can be for any type of job hunt.
Here are my top things to do:
Network Constantly – You are already doing that here, but you need to use LinkedIn and reach out to every one of your contacts. Ask connections to share your profile. Networking will help you get past the job boards quicker and get your resume on to the hiring manager’s desk.
Use AI to Strengthen your Resume and Profile – I used ChatGPT and it really polished up my resume. It removed anything that was irrelevant and summed up older work experience.Use AI to help you write a more polished LinkedIn profile if needed.
Practice Interviews with AI – Let AI know who you are interviewing with and it will help you practice.
Research Sitecore Partners and their Clients – You can find a list of Sitecore Partners here. Dig deeper into Sitecore partners and find out if any of their current/former clients have job openings.
Use targeted job searches and alerts – LinkedIn job alerts worked especially well for me. I kept searches simple with keywords like “Sitecore”. I used Google to find job opening as well as it lists companies hiring and keeps track of ones you applied to.
Look Beyond Job Sites – If there’s a specific area you want to target, look for those types of sites and look at their job openings. They don’t always post on job sites.
Look for Advice from Outside Resources – Check out various YouTube channels for advice. I liked the life after layoffs channel.
Maintain Your Daily Work Structure – Keep your schedule similar to how you would if you were working. Get up and be productive the same time you would normally work.
Exercise and Take Care of Your Mental Health – Only consistent thing in my life has been running. The physical and mental benefits will help you stay focused.
Give Yourself a Break – Looking for a new position is a job in itself. Take a breather.
Take on Side Projects if Needed – Do some freelancing to occupy your time. Lots of small businesses can benefit from event a simple WordPress site.
If you are going through a tough time right now, there is light at the end of the tunnel. Don’t give up. Now is the time to keep moving forward.
For some reason this song kept playing in my playlist. I think it was talking to me. 🙂 I hope this blog helped you in some way.
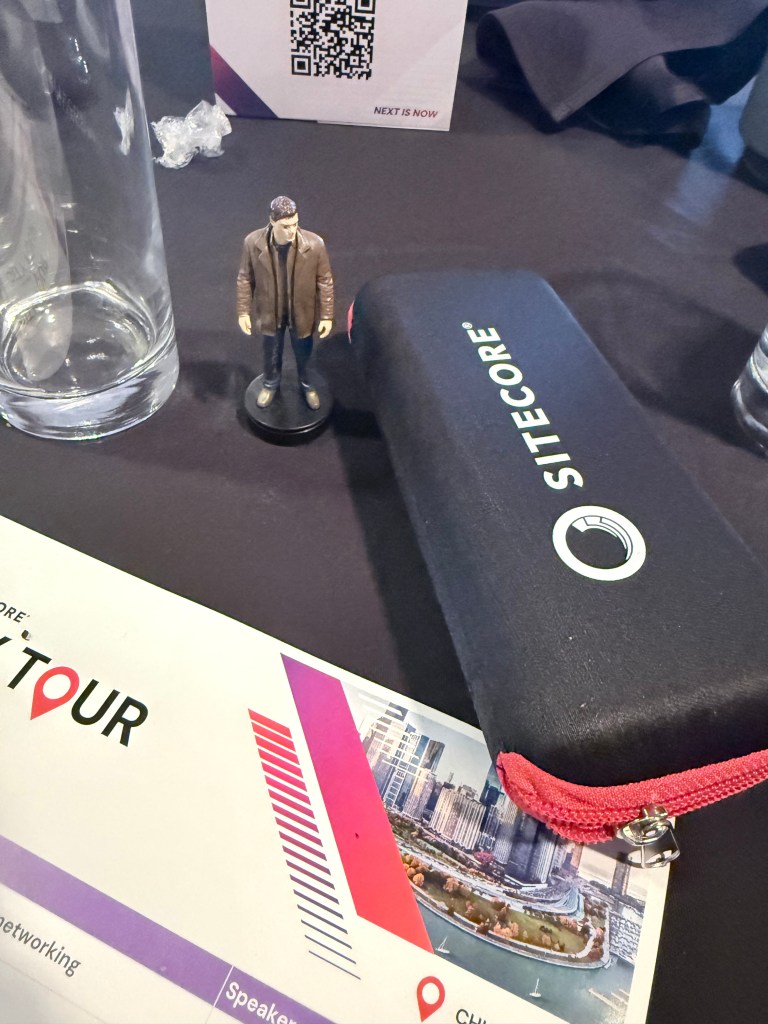
It was a great experience attending the Sitecore City Tour while representing my new adventure. A spoiler about where I landed is at the end of the blog, but you have to read it all the way through first.
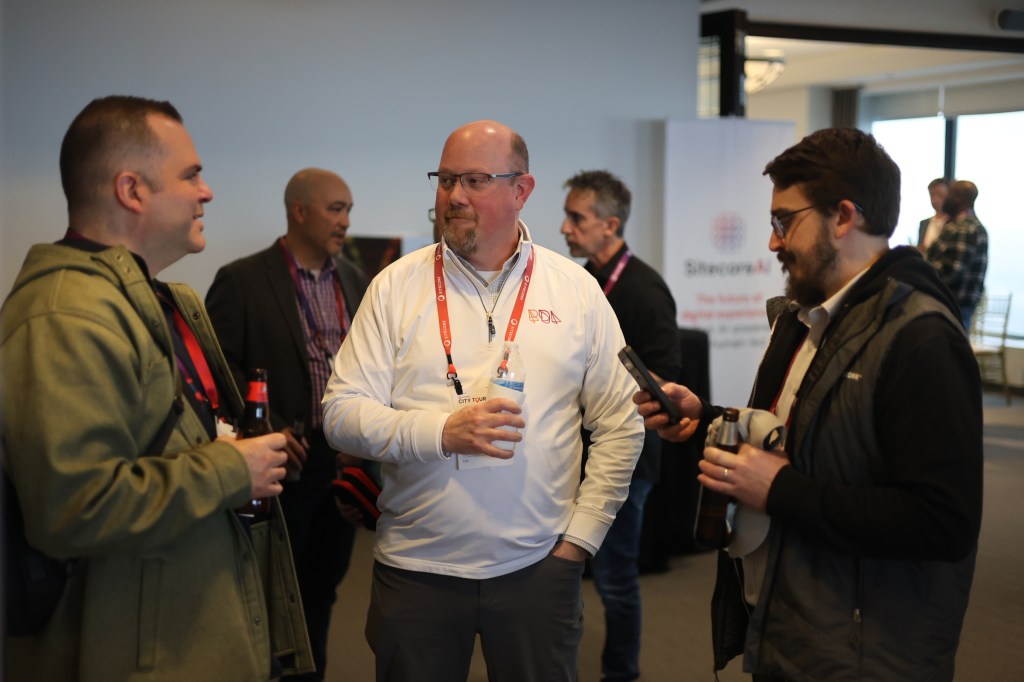
One of the best parts of the event was reconnecting with the Sitecore community. Great presentations around SitecoreAI and digital transformation. I got some great ideas I can bring into my new role. I also met someone who is on a similar journey in the same industry.
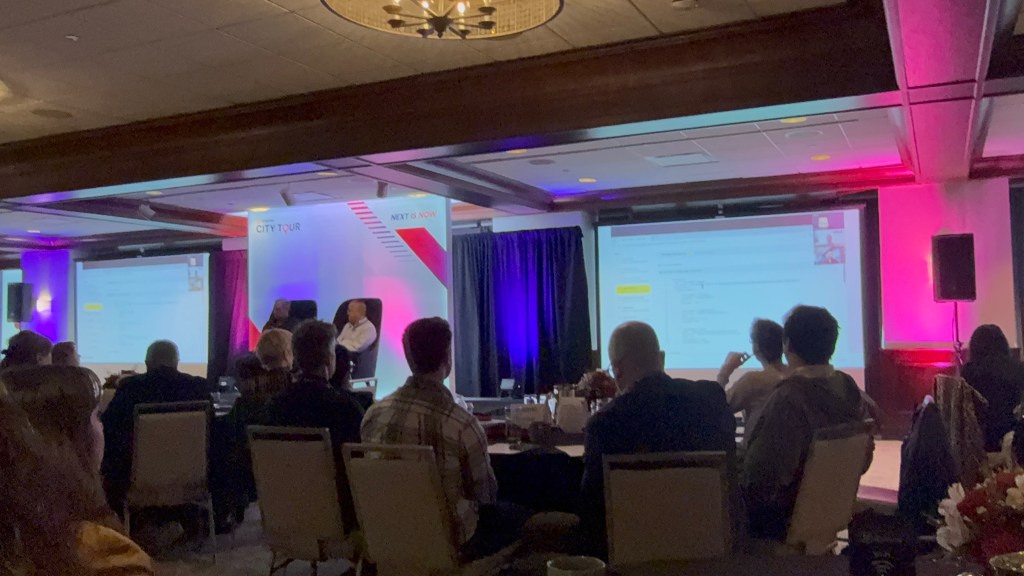
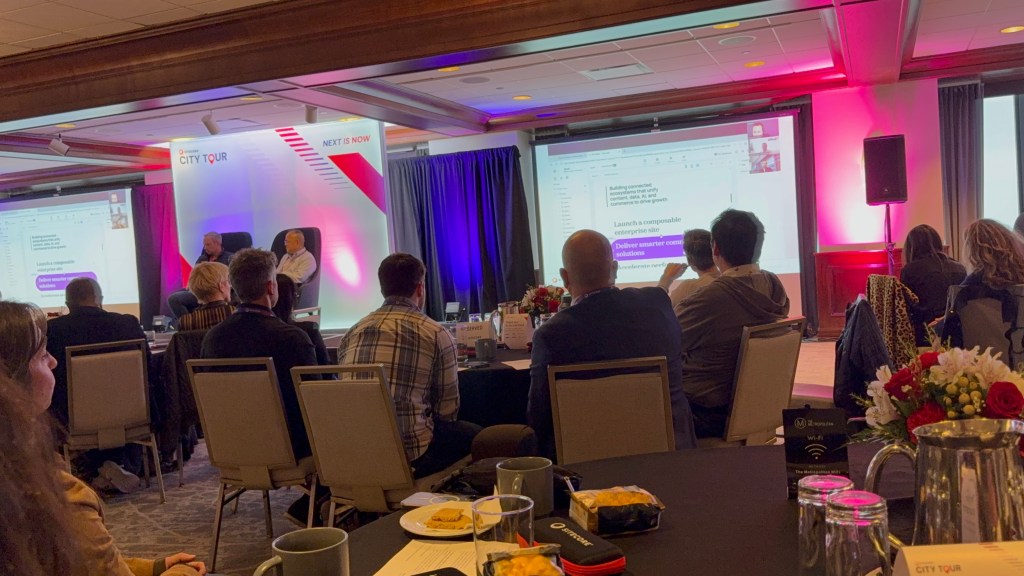
Below is a summary of each presentation through both words and pictures.
Welcome Address
Speakers:
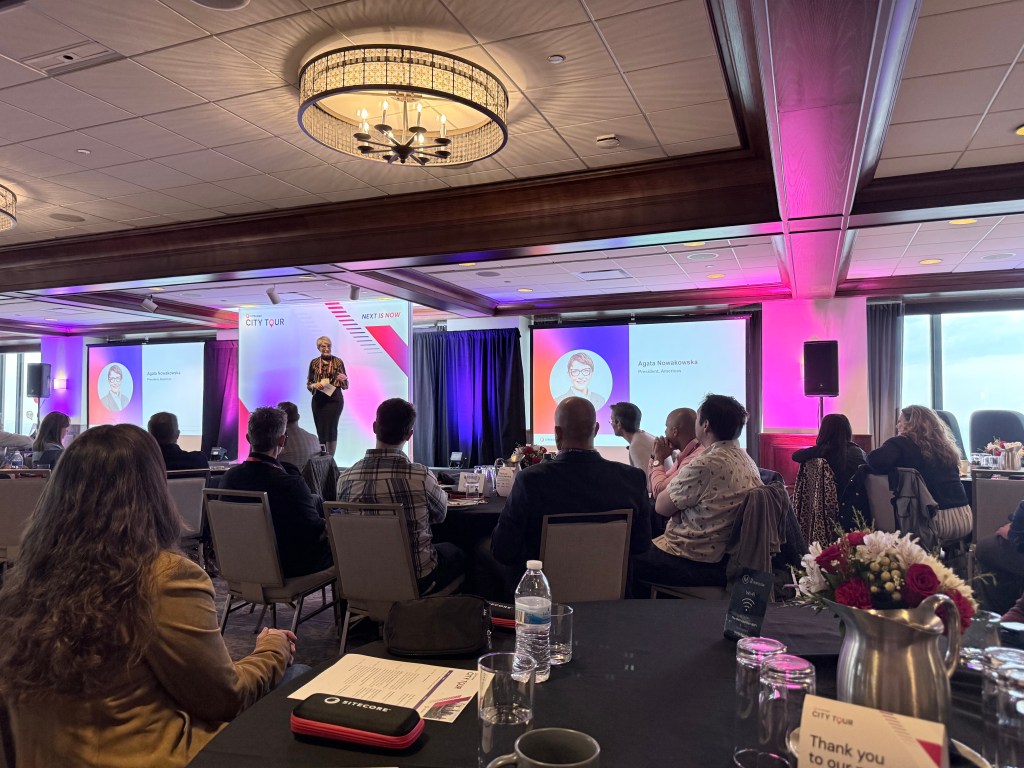
Dave Tilbury
Agata Nowakowska
Summary
The event opened with discussions around Sitecore’s long-term vision, operational scale, and continued investment in AI-driven digital experiences. There was a strong emphasis on helping organizations adapt to rapid change while continuing to modernize customer engagement and content operations.
Nothing like a great start to any event. Agata recently moved to Chicago so we now have another local celebrity here.
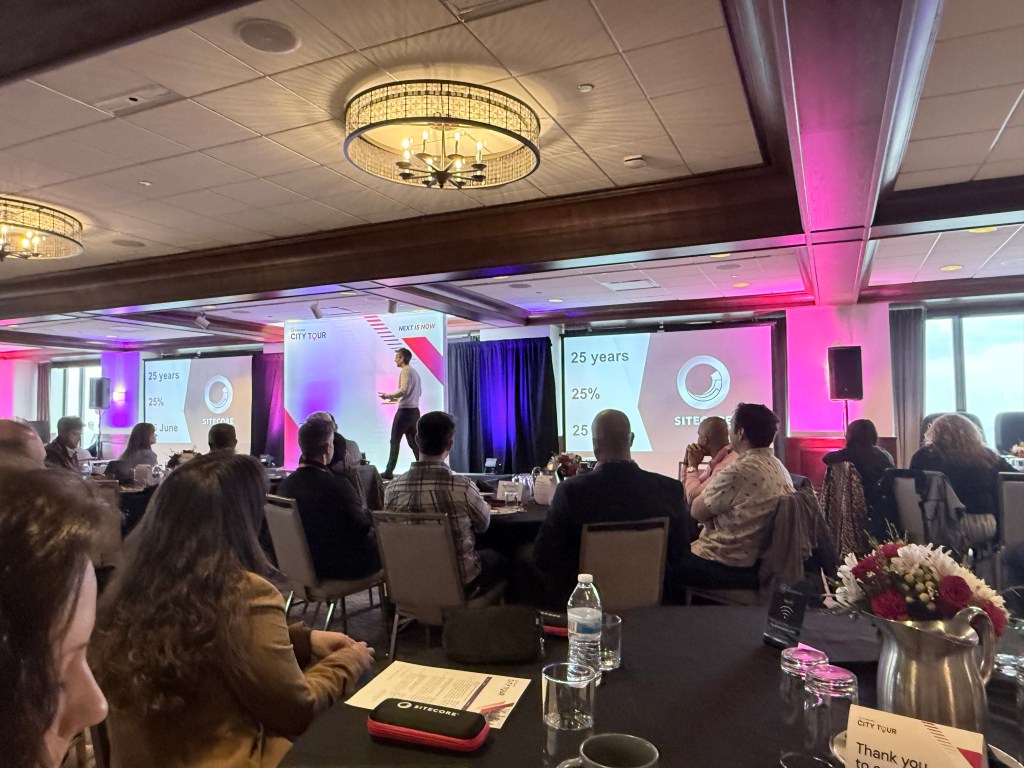
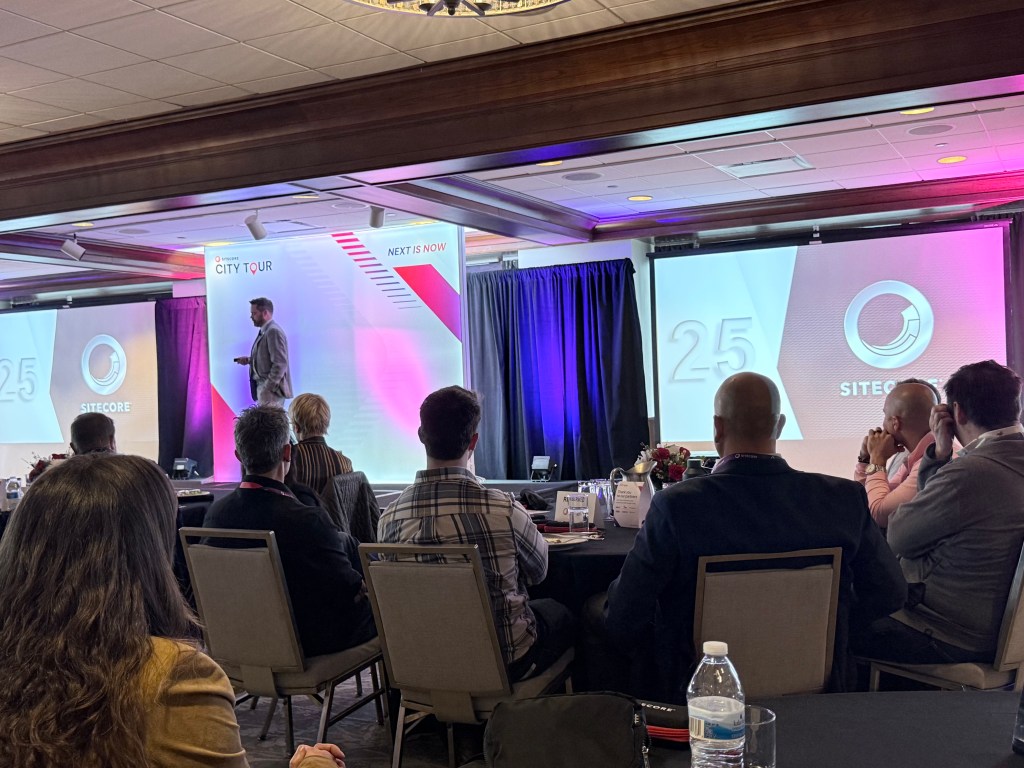
A Story About a Lighthouse
Speaker:
Dave Michela
Summary
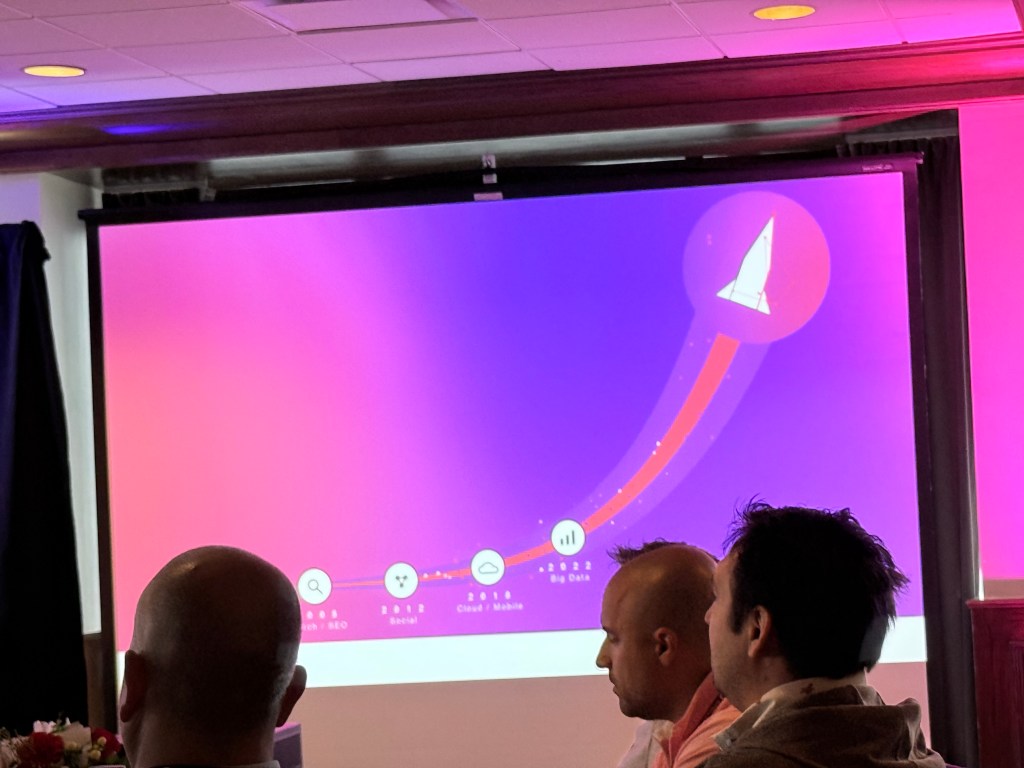
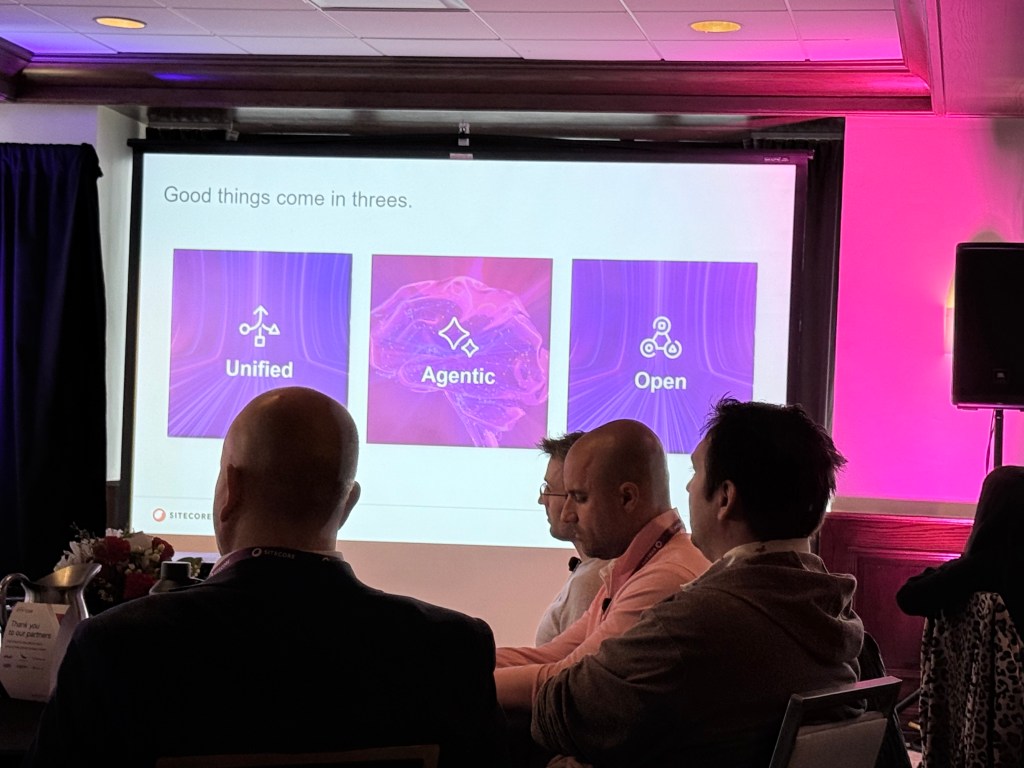
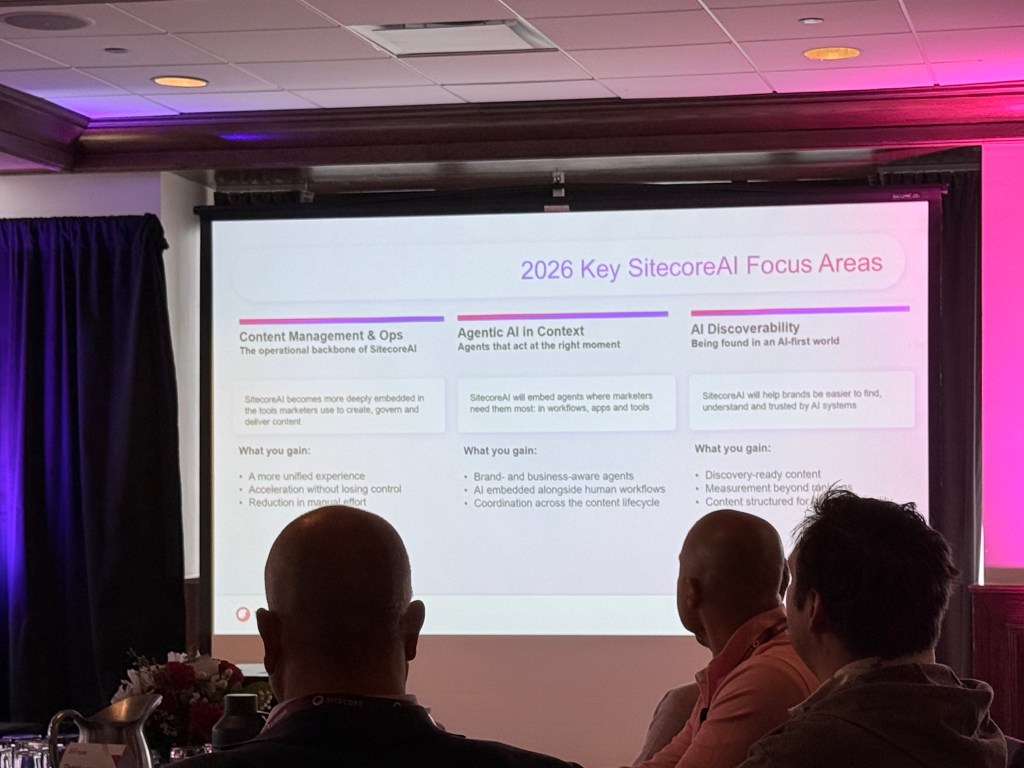
This presentation focused on Sitecore’s long-term product strategy and how organizations can navigate rapid transformation as AI reshapes digital experience platforms. Themes around clarity, direction, openness, unified platforms, and customer partnership were discussed throughout the session. There was also discussion around Sitecore’s ecosystem, marketplace integrations, Microsoft partnership, and the company’s focus areas heading into 2026.This was a great journey on how Sitecore started and where it is headed. Excited to get a glimpse into the future. Did you know the logo was created by a looking down at lighthouse stairs?
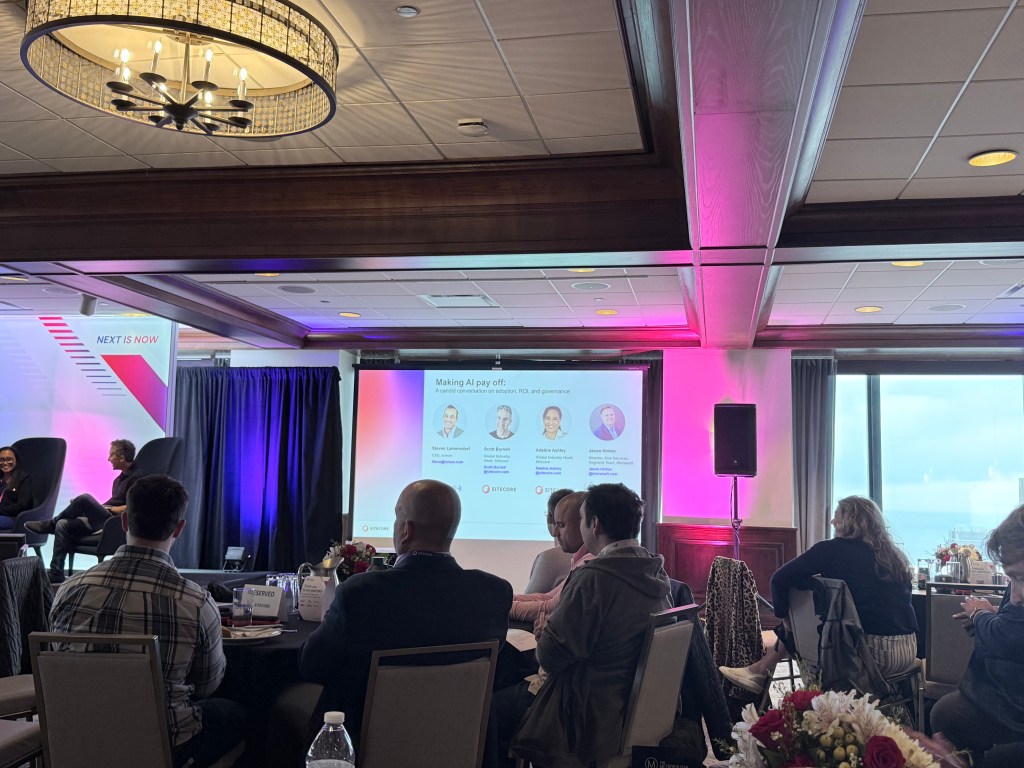
Making AI Pay Off: A Candid Conversation on Adoption, ROI, and Governance
Description
Industry leaders share practical insights on moving AI from experimentation to impact, including how organizations prioritize use cases, measure ROI, and establish governance as AI scales across the enterprise.
Summary
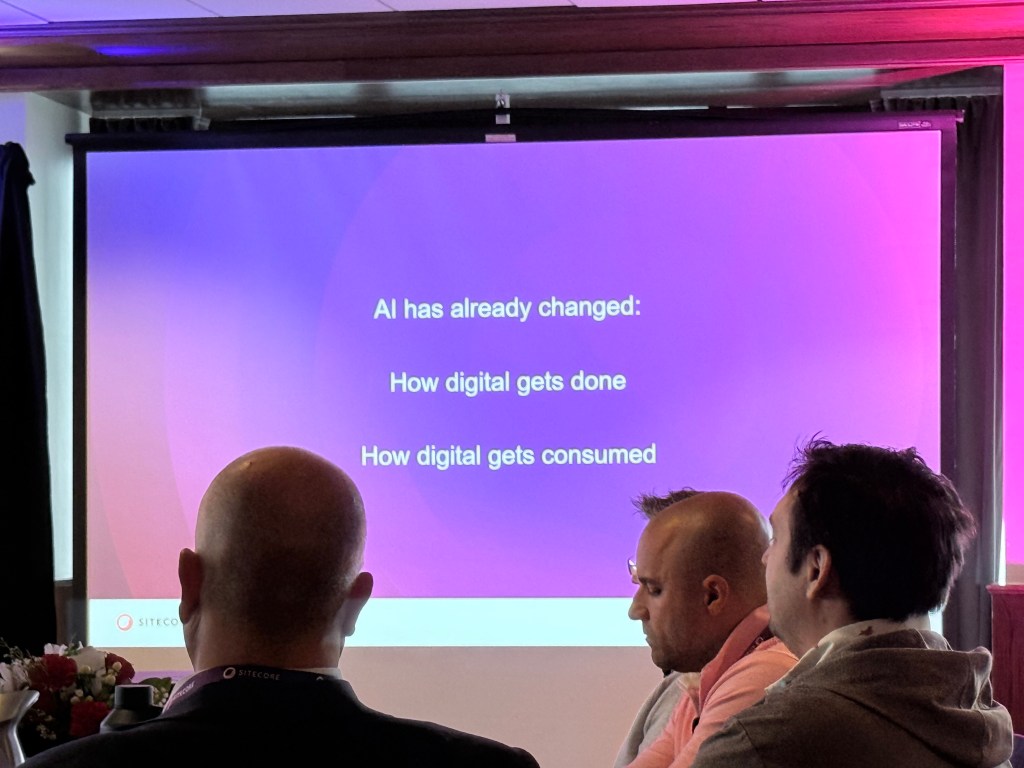
This session focused on the practical realities of AI adoption inside enterprise organizations. The discussion centered around governance, ROI, organizational buy-in, and how companies are evaluating whether AI can create measurable operational improvements.
Speakers
Jason Hinton — Director, SE&O – C Services Segment Team, Microsoft
A lot of good points on this one. Here are some of the notes I took.
It is not just about funding, but if AI can really make things faster.
AI needs to be something that helps and does not impact budget.
People are more likely to adopt when everyone buys in.
There is real pressure of everyone else using AI.
There are Governance and transparency concerns in healthcare.
Mentioned AI as tool optimizing services in healthcare.
Trying to make things look better is not enough.
If AI is not embedded in technology, it could be replaced by AI.
For healthcare it could increase productivity and help patients.
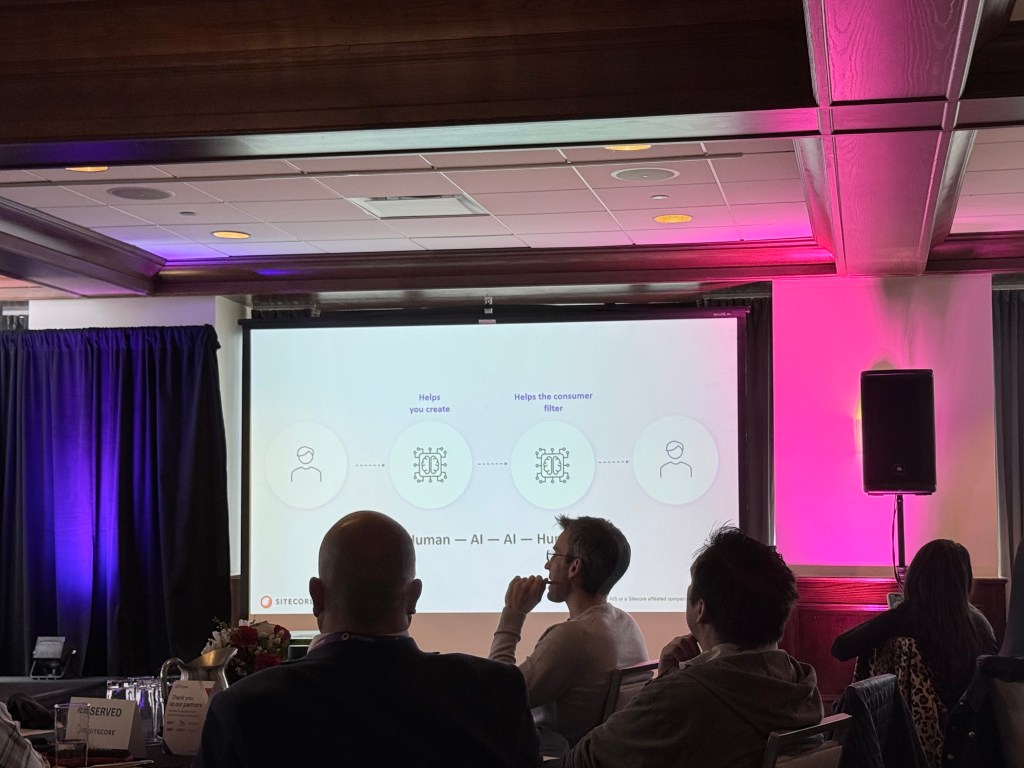
A challenge is how to keep marketer in the loop.
A Marketer provides the critical thinking and defines the guard rails.
AI is a partner
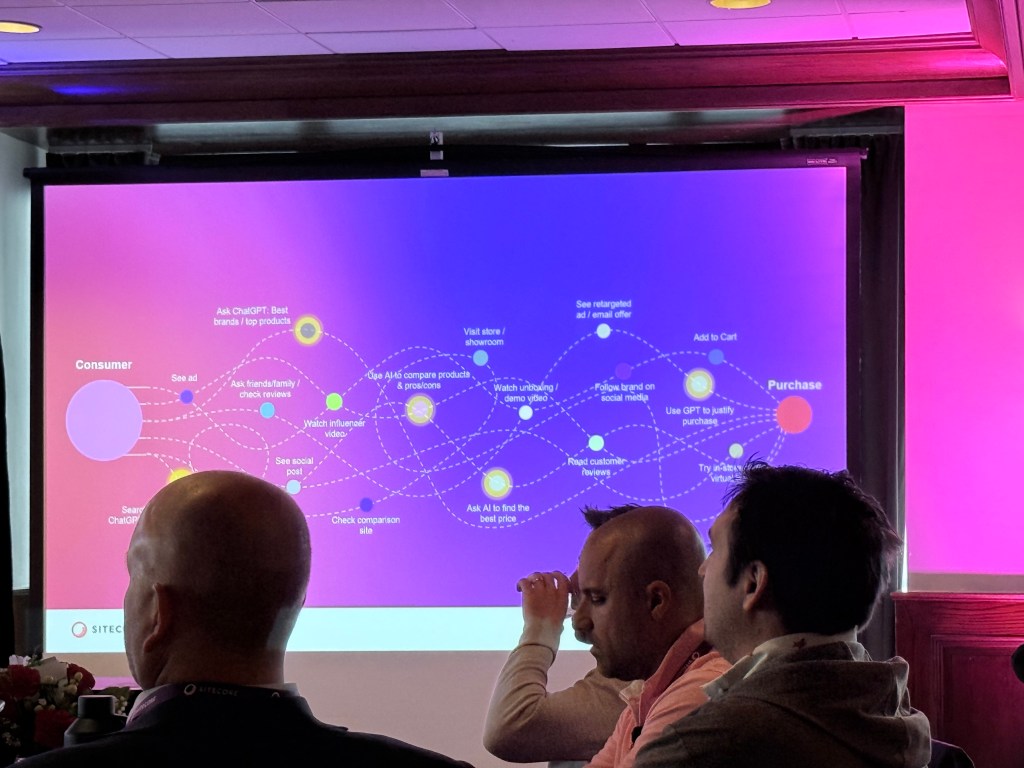
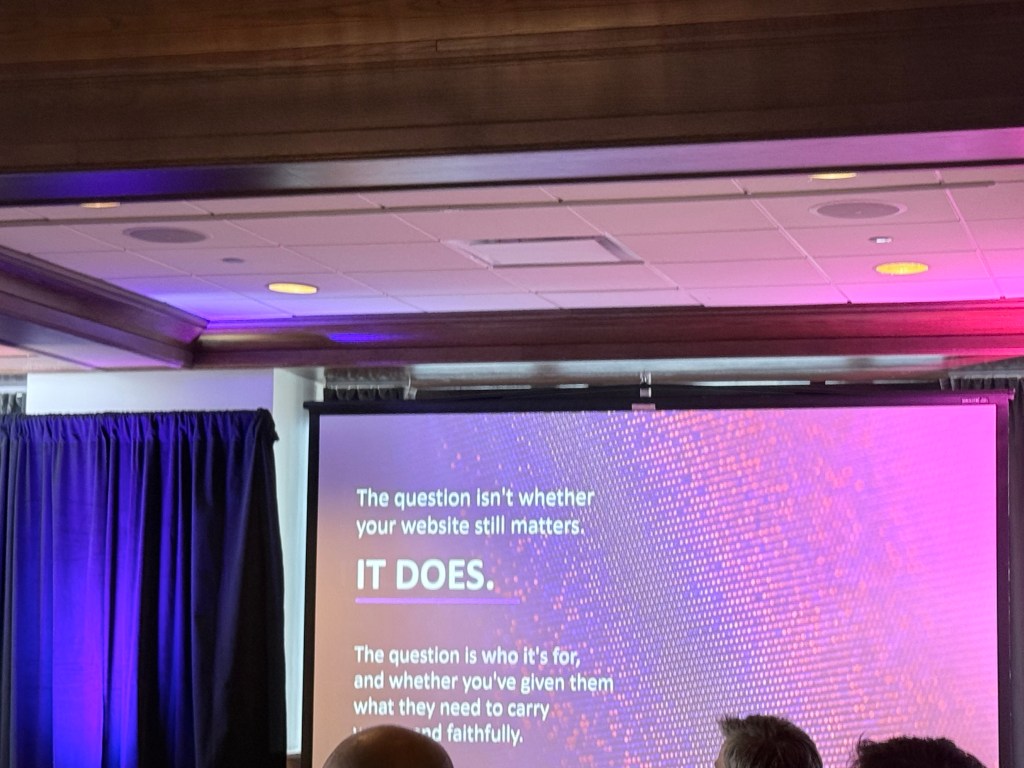
After the Website: How AI Changes Everything Brands Think They Know About Digital Experience
Description
As AI becomes the experience layer, brands must rethink the role of the website. Learn how discovery, content, and engagement evolve in an AI-driven world — and what leaders must do to stay relevant.
Speaker
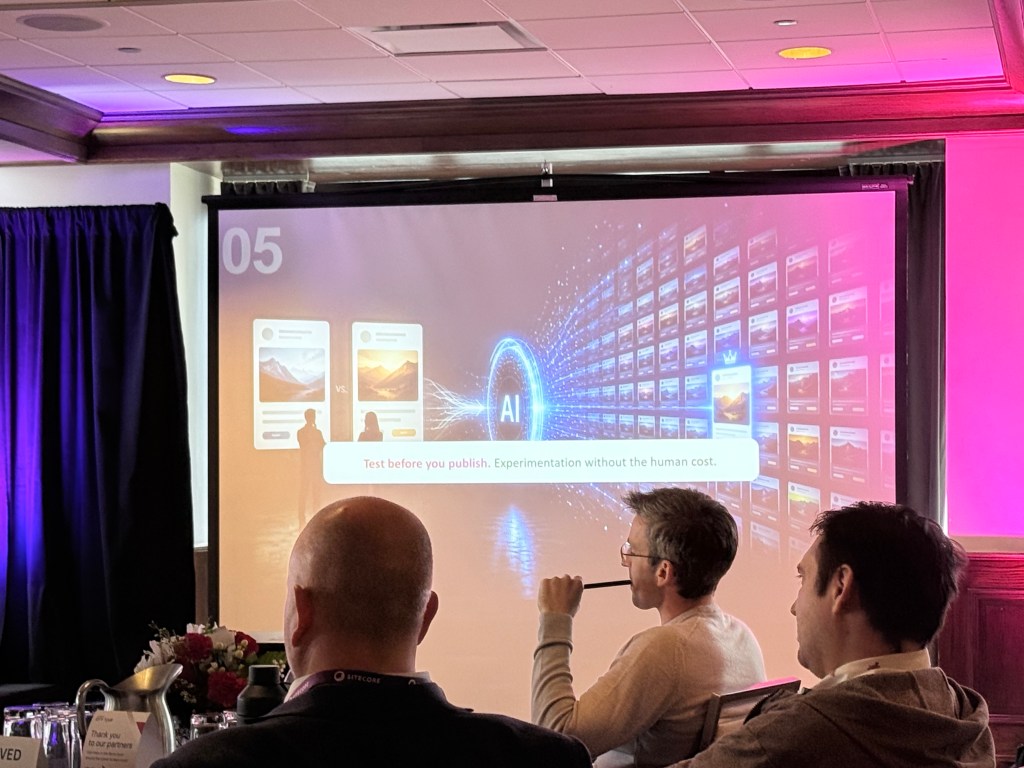
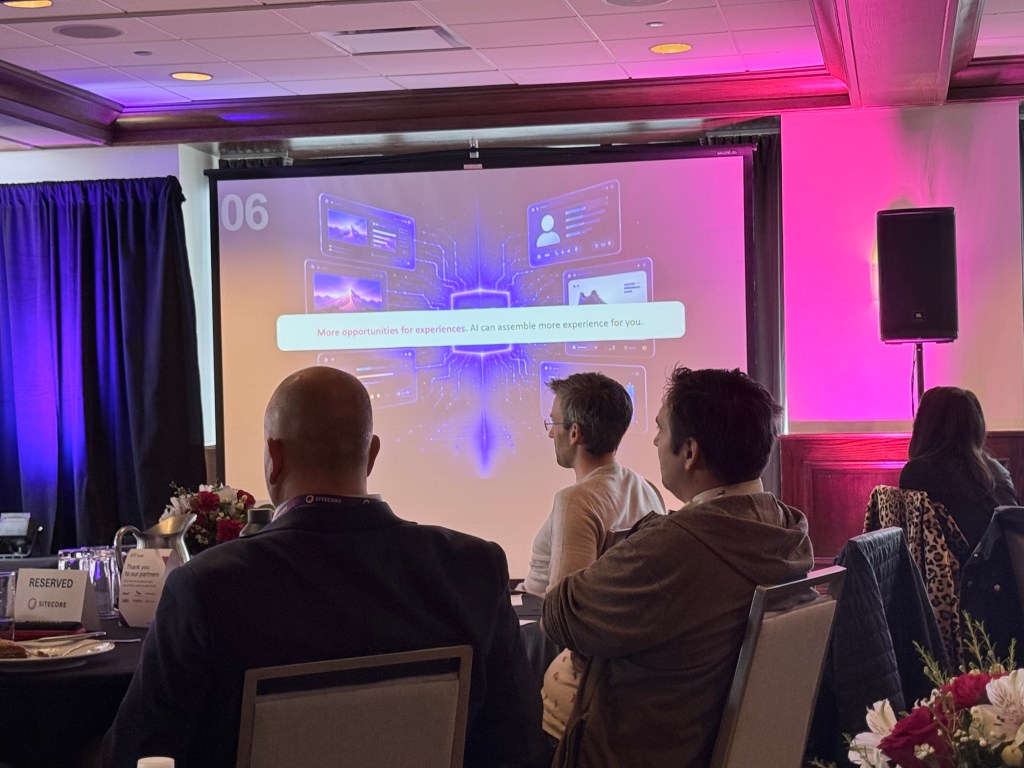
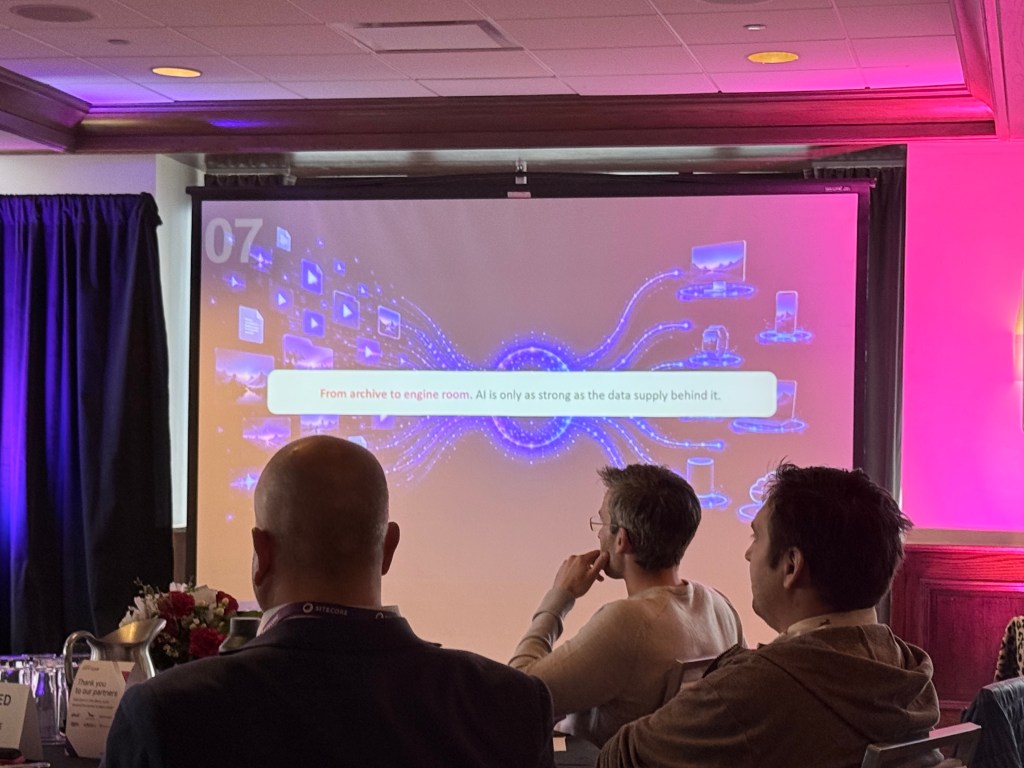
Scott Liewehr — Global Vice President, Market Strategy and Growth, SitecoreA lot to unpack here. Here are some of the notes I took.
Summary
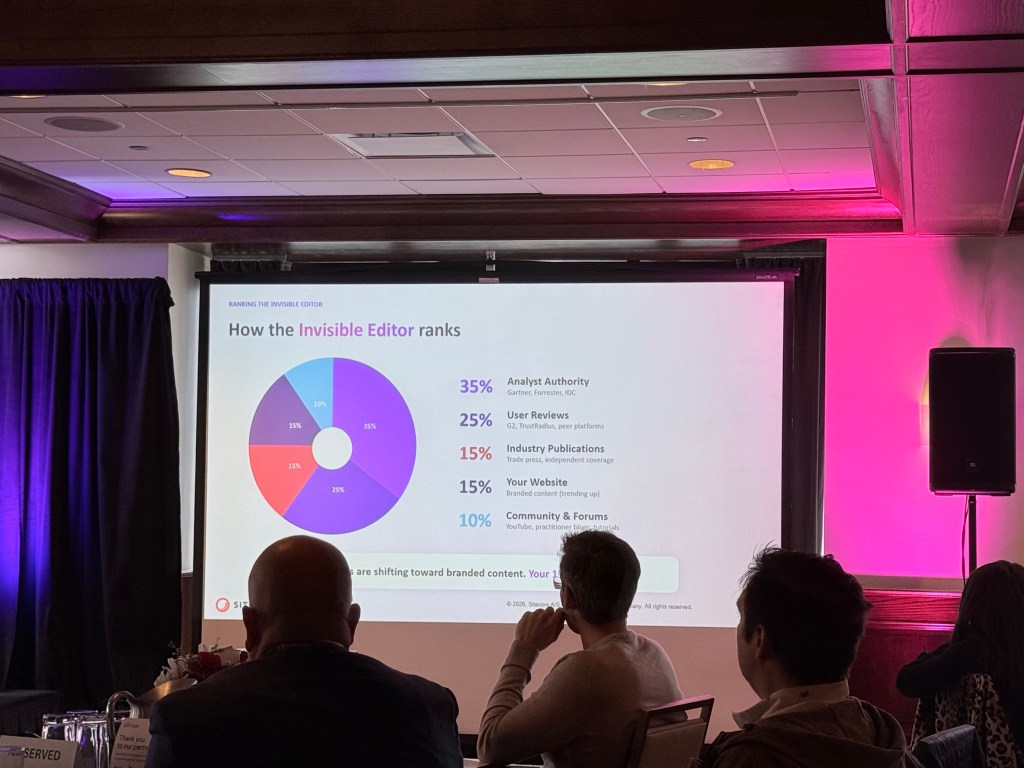
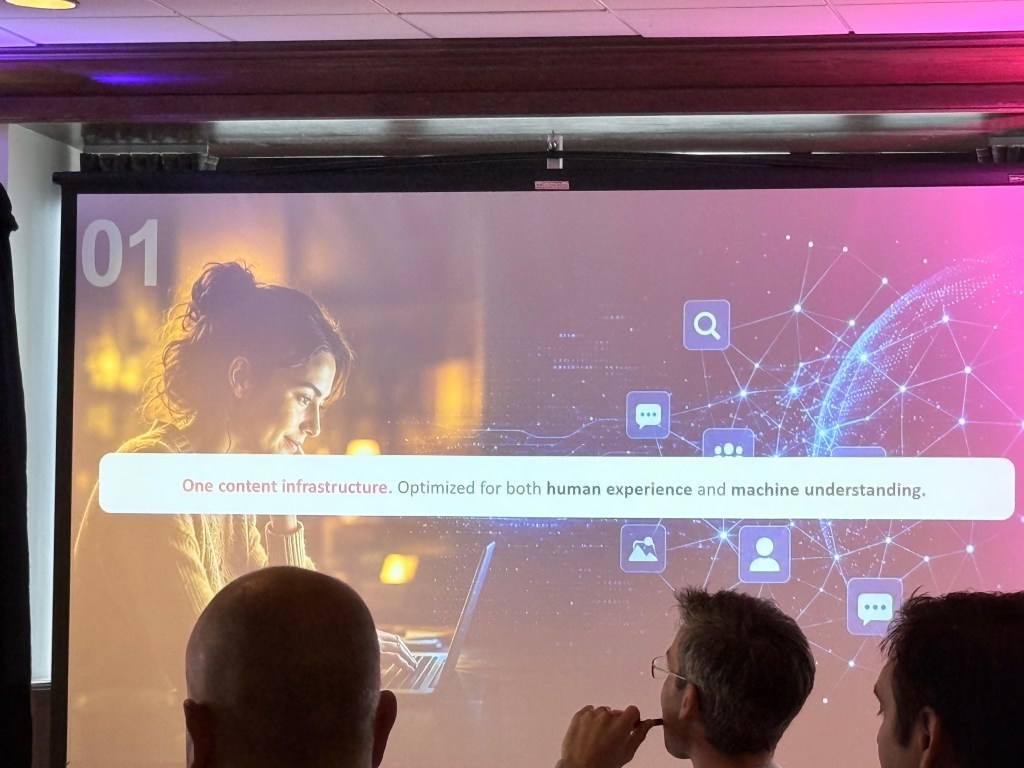
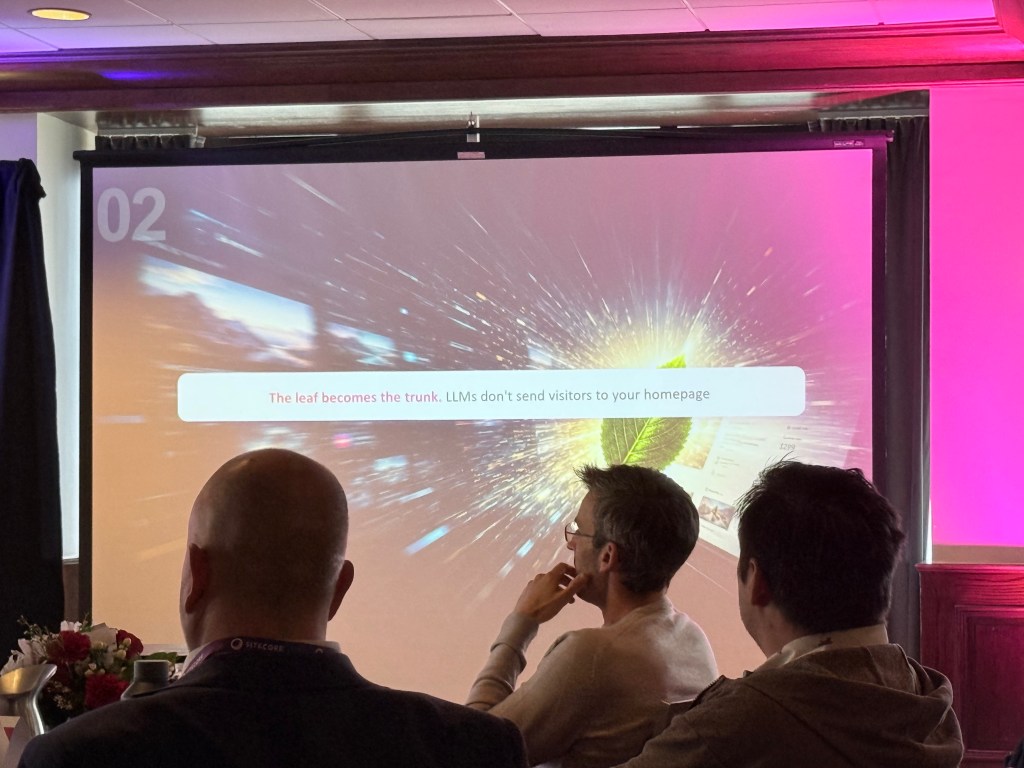
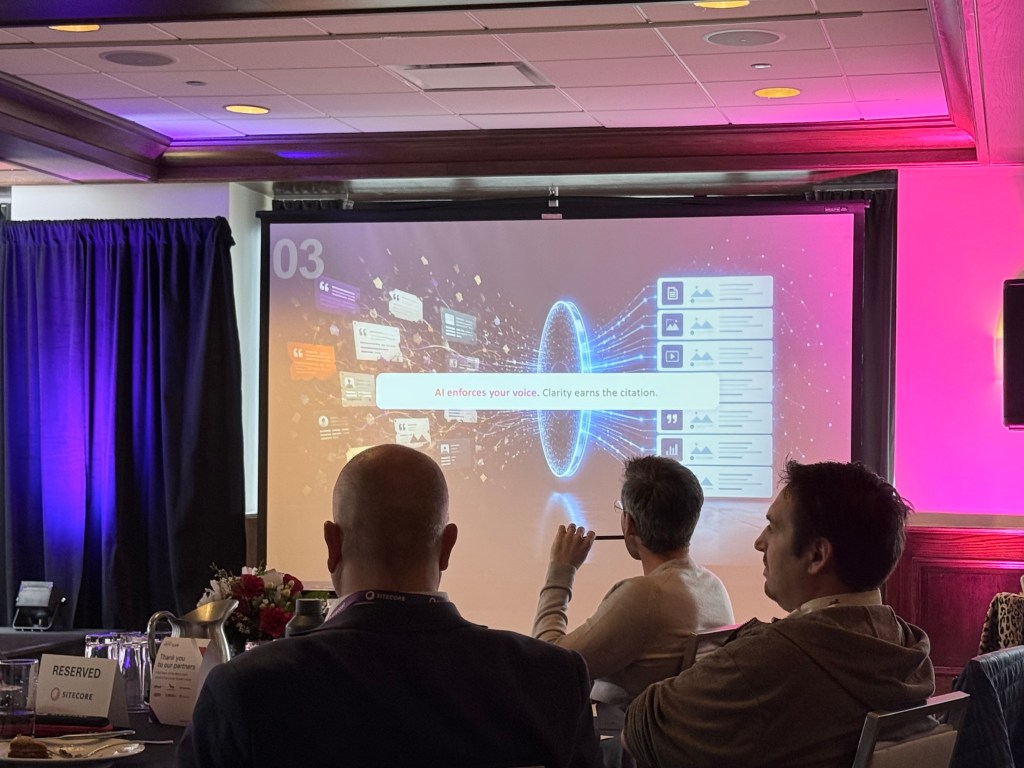
This session explored how AI is reshaping discovery, engagement, and the role of the traditional website. As users increasingly turn to AI-powered experiences for research and purchasing decisions, organizations must rethink how they create and structure content.
From my notes:
Users start turning to AI for purchases.
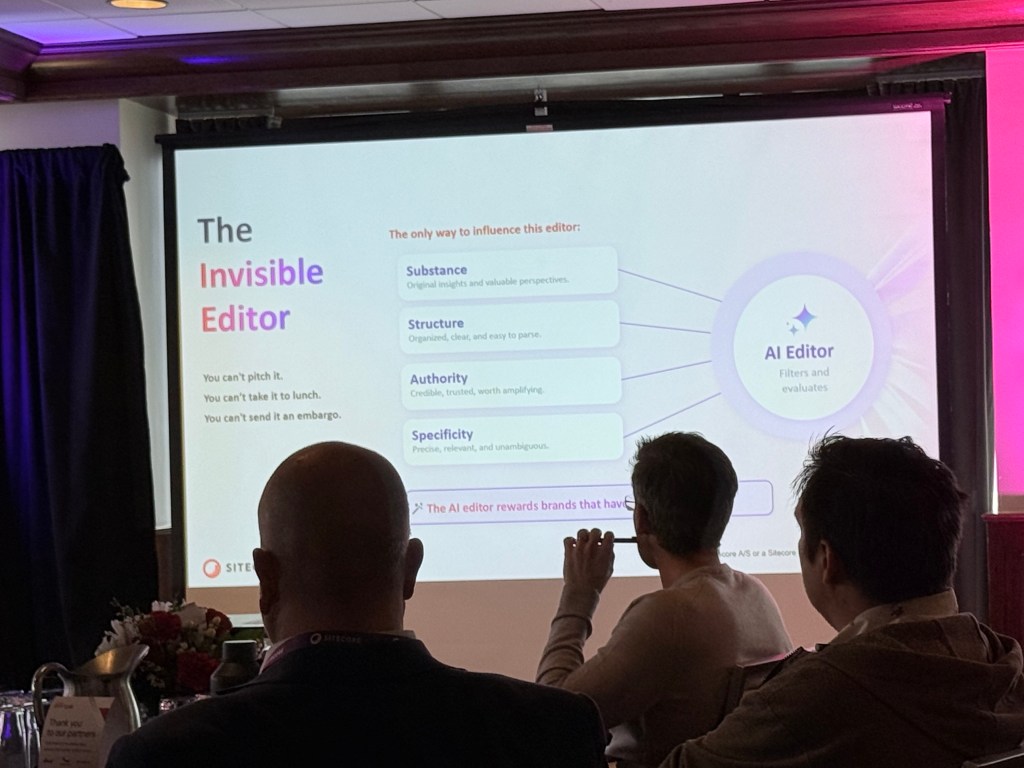
AI rewards brands that have a point of view.
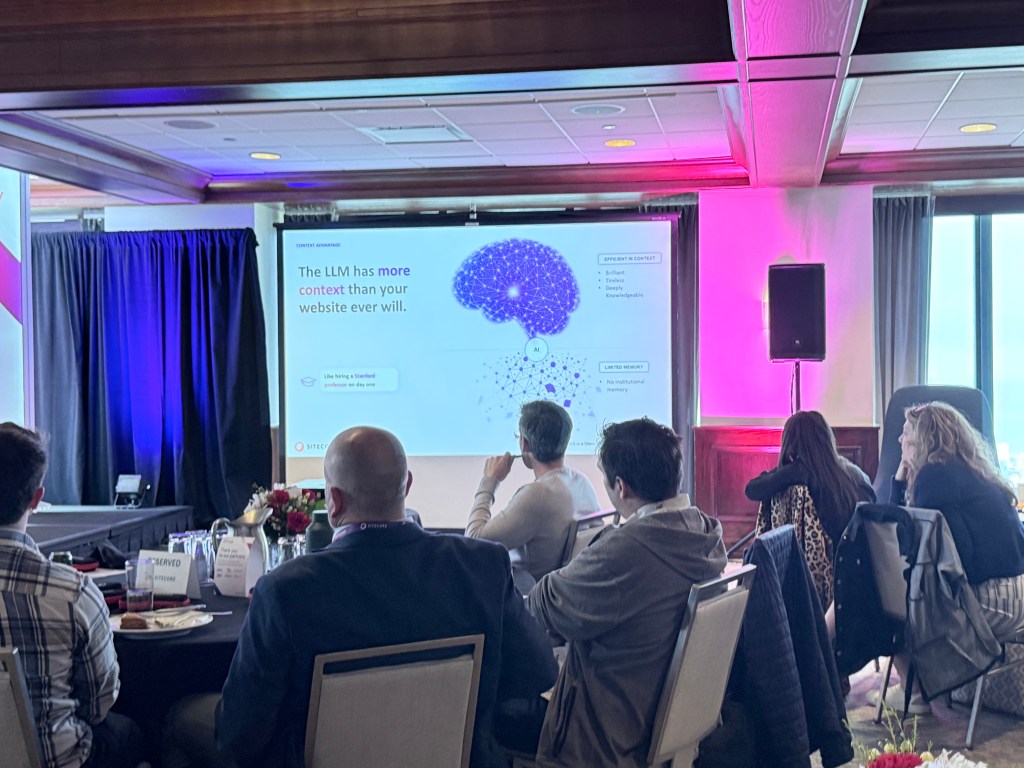
LLM may create too much “fluff” if they don’t know your business.
Content audit needs AI visibility dimension.
What can I put on a page to get them back to the page from AI?
Create content more authentically.
Testing content with agents and humans is critical.
Staying Relevant as AI Reshapes How We Discover and Choose
Speakers
Carmen Crist — AVP, Marketing Operations, Michigan State University
Scott Liewehr — Global Vice President, Market Strategy and Growth, Sitecore
Summary
Michigan State University shared its digital transformation journey and the challenges that came with managing fragmented platforms, inconsistent governance, and growing AI-driven discovery expectations.
This is was really cool to hear how MSU transformed their different CMS sites to Sitecore. They had over 130 sites.
From my notes:
Talked about digital journey.
Gathered info from other university websites.
Dozens of CMS platforms across university.
Why transition to Sitecore AIComposable with different technologies? Worked better in their ecosystem.
Mentioned the slogan“Next is now” — right thing to do is move forward and not wait.
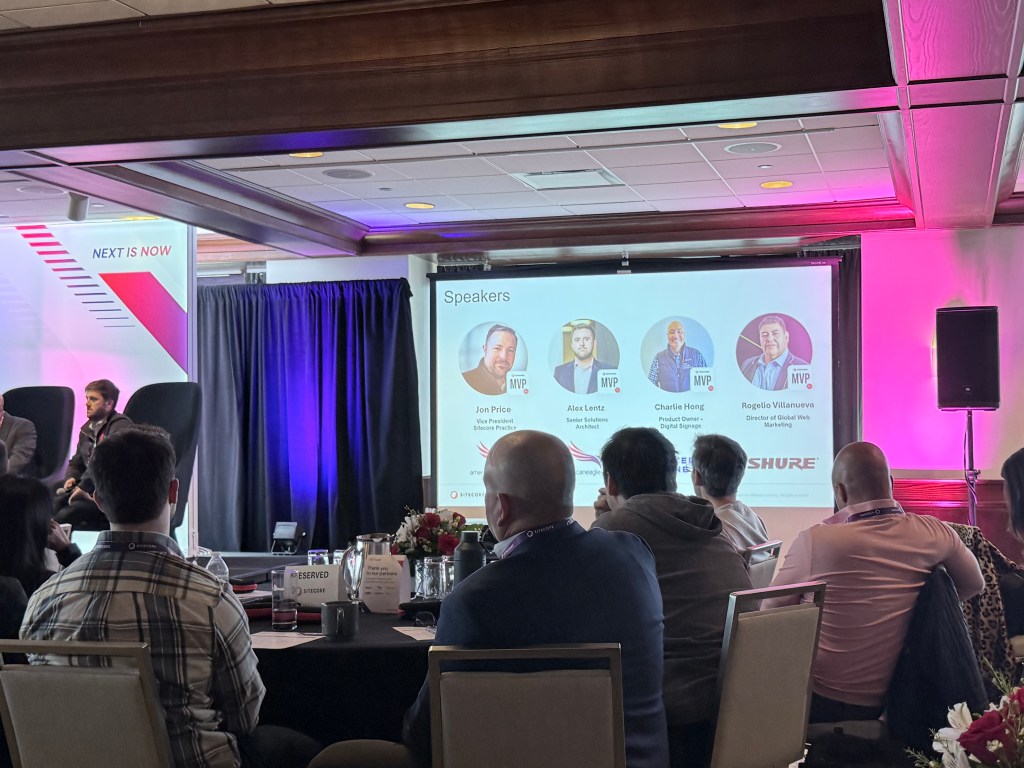
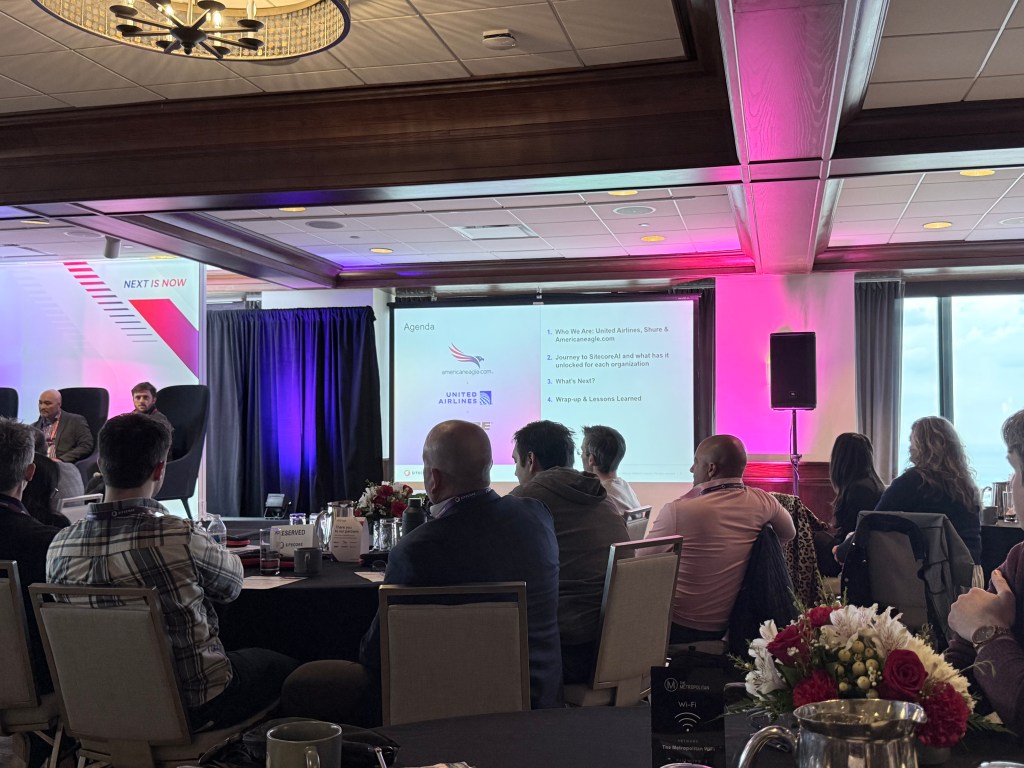
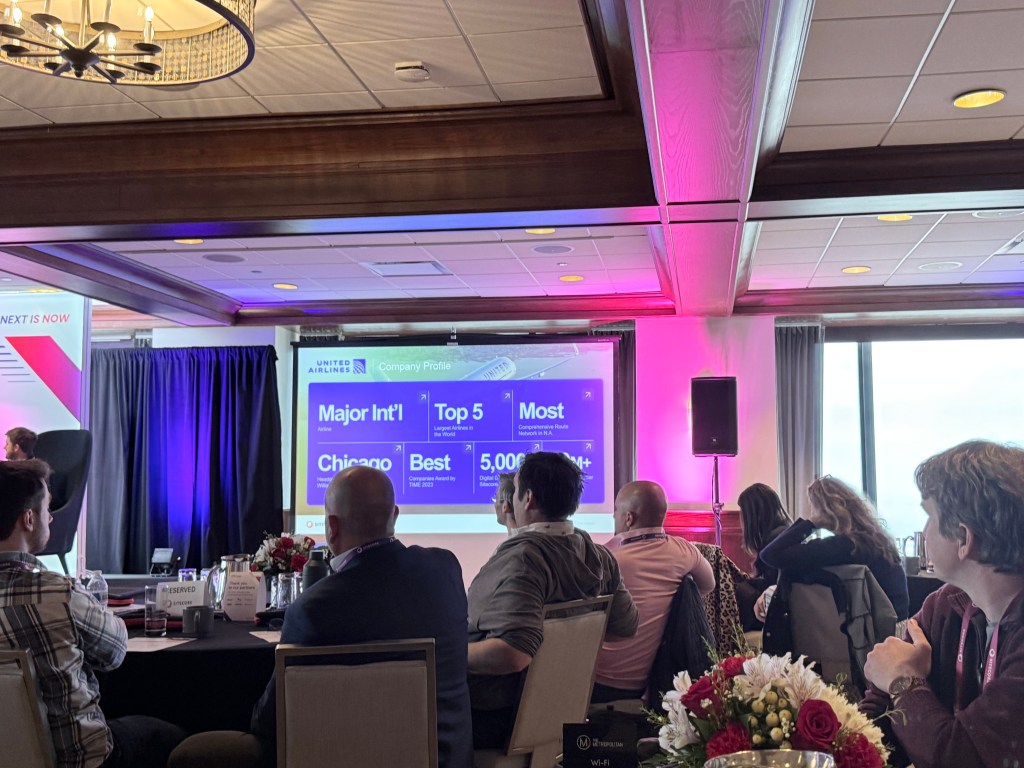
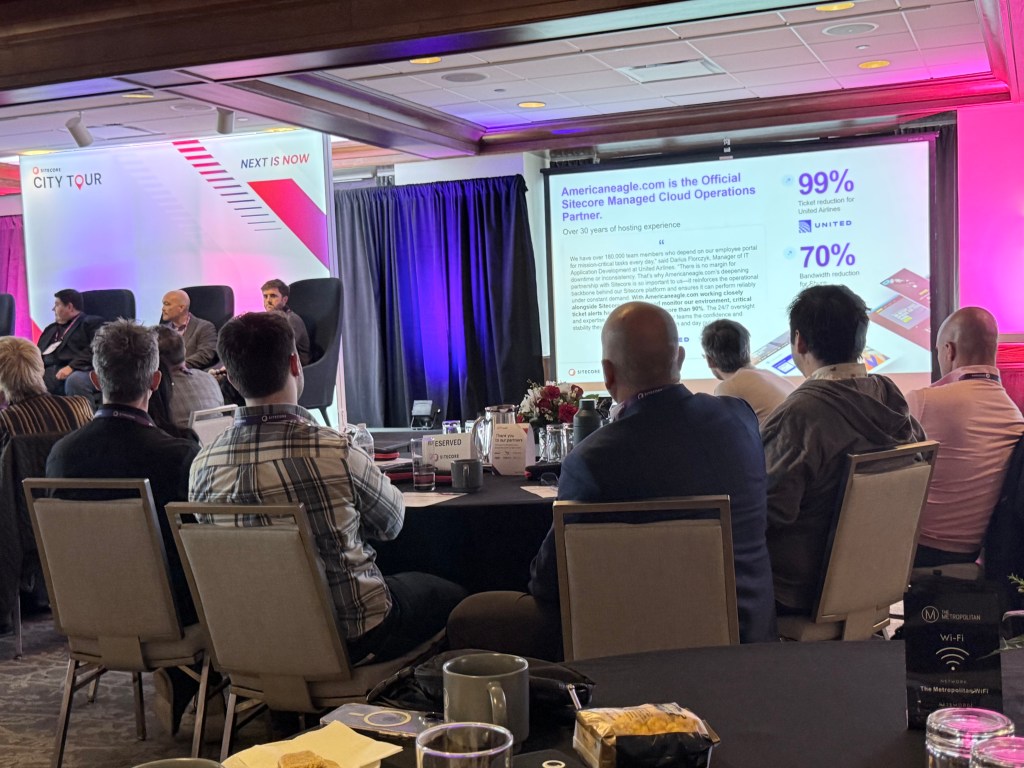
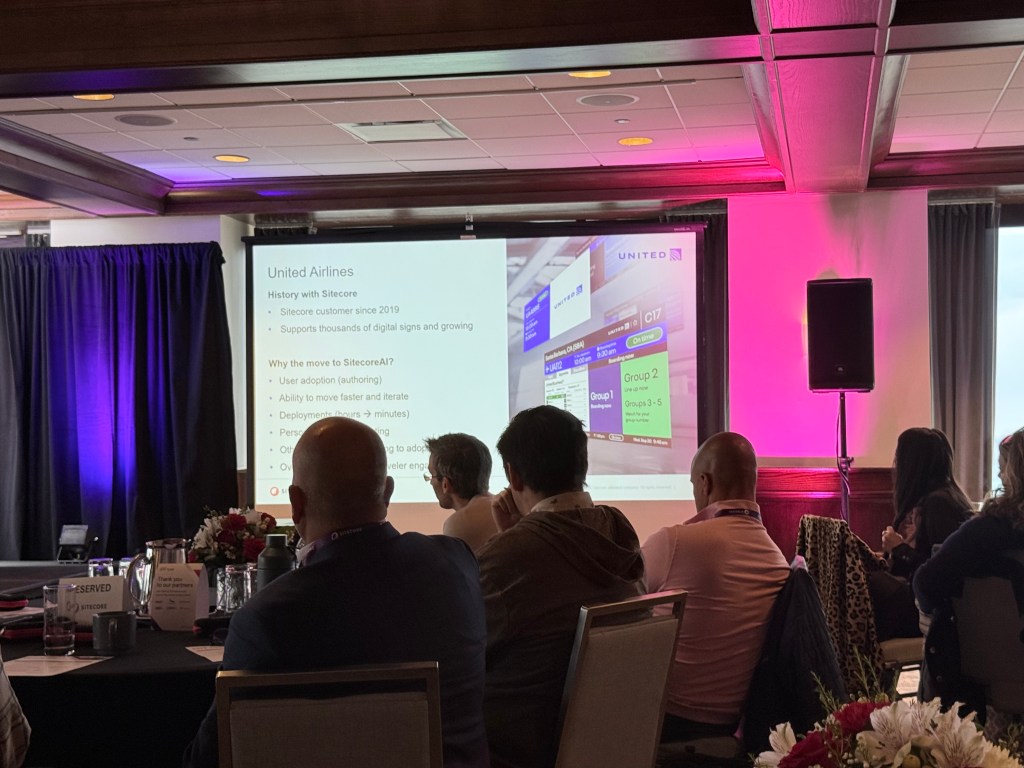
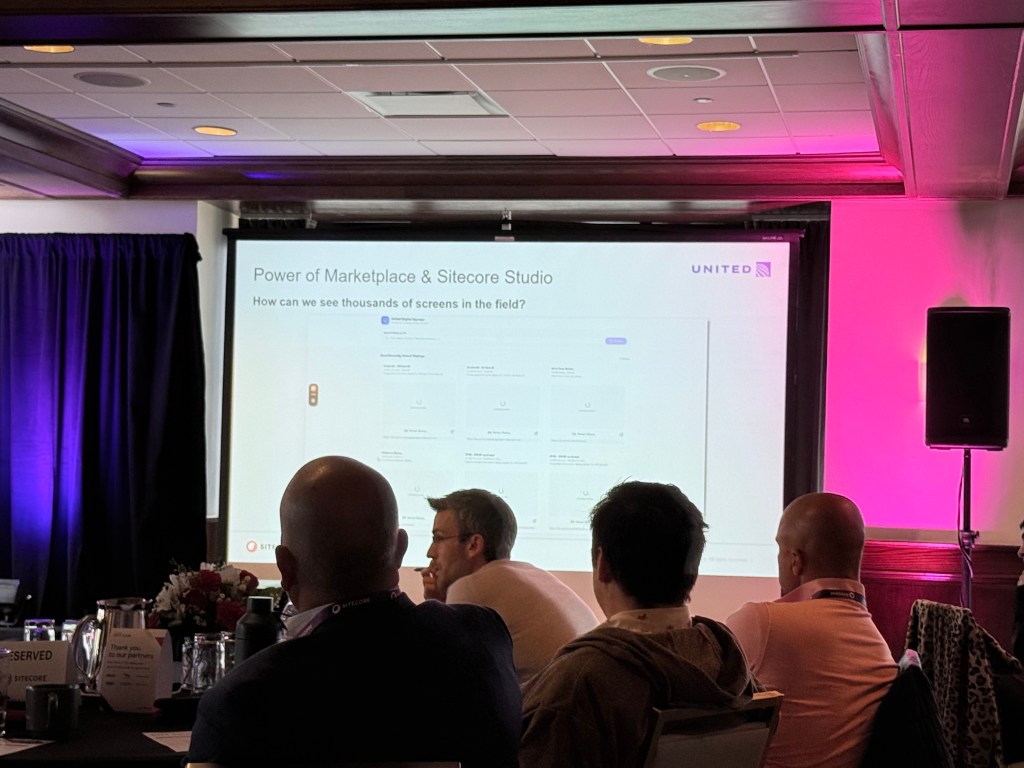
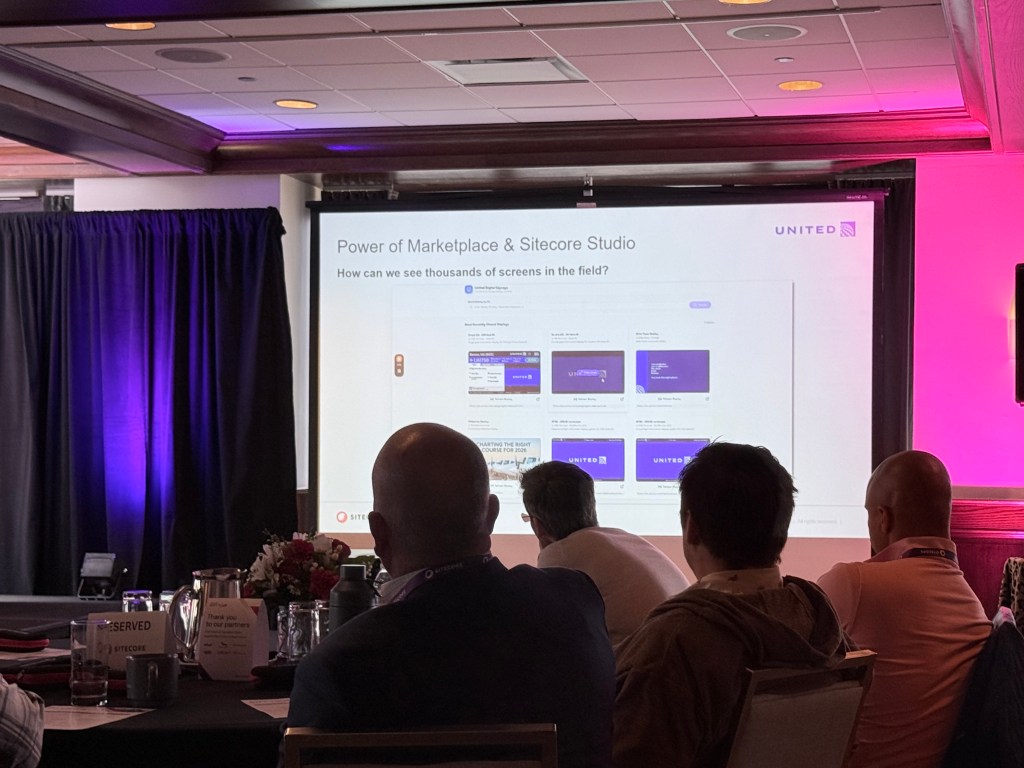
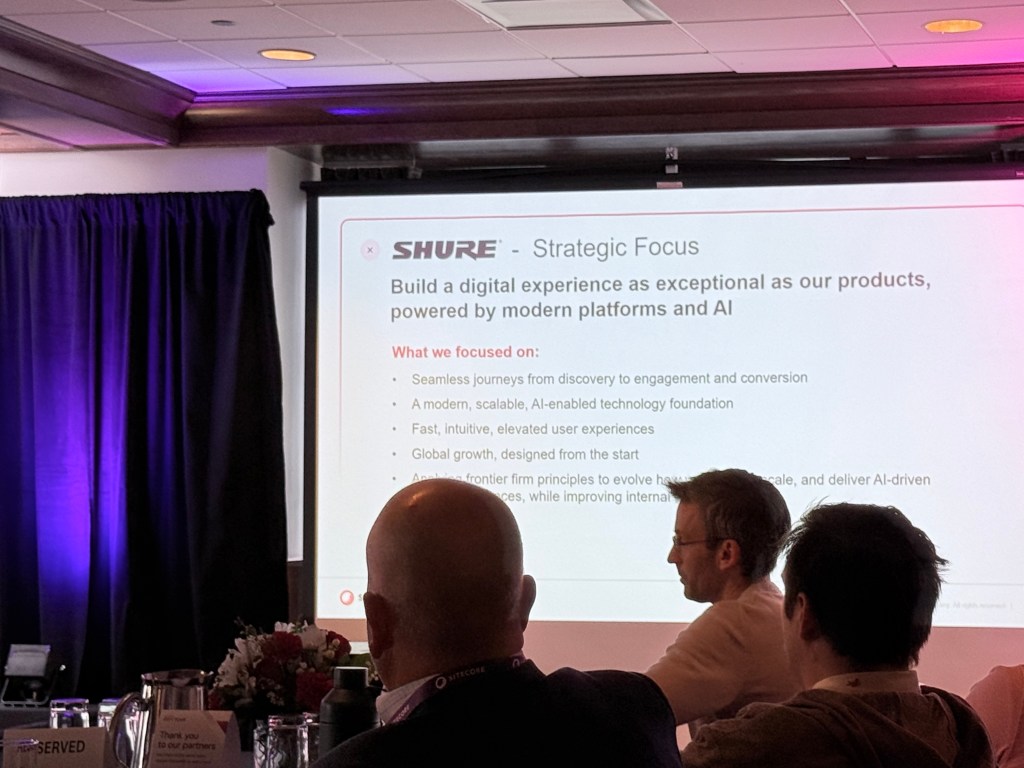
Operationalizing SitecoreAI: Real-World Journeys from United Airlines & Shure
Speakers
Charles Hong — Product Owner, Digital Signage, United Airlines
Rogelio Villanueva — Director of Global Web Marketing, Shure
This session focused on how organizations are operationalizing SitecoreAI at scale through workflow integration, governance, and change management. Real-world examples demonstrated how AI can improve efficiency and customer experience when integrated into existing business processes.
Joining an in-house (maybe a spoiler) I really looked forward to this one. Charles and Rog were one of the many Sitecore community members that inspired me to make the change. Hearing from Americaneagle.com is always great because they are huge part of the Chicago market.
From my notes:
Journey to Sitecore AI
Figma – Showed how this played a role.
Marketplace – Custom apps and public apps were impressive.
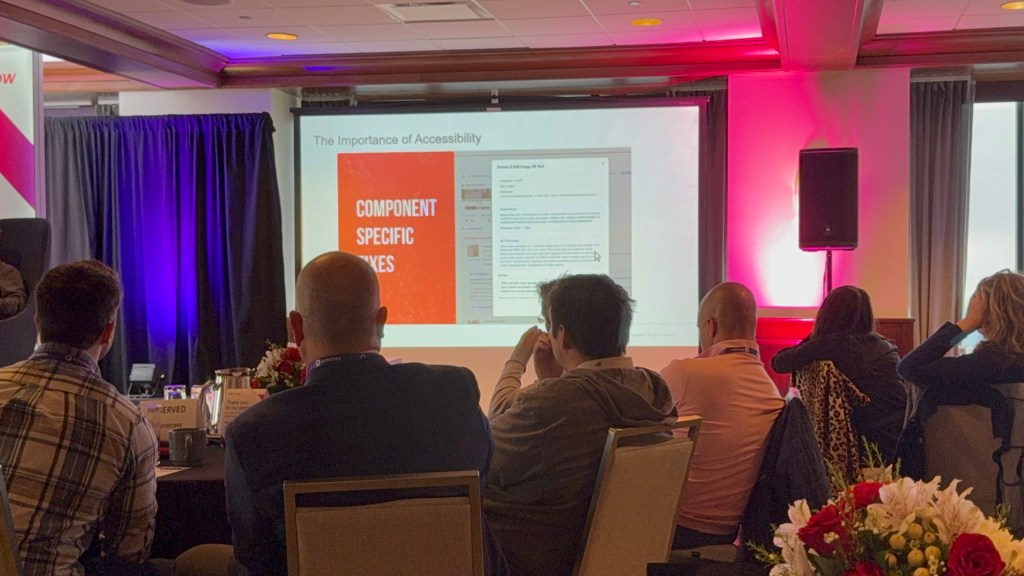
Accessibility – One of the most important things a website must have. Rog made a good point.
The Migrator = game changer – This was really cool getting from one CMS to SitecoreAI. I will mention that a lot of partners had a similar tool.
The Migration Game Changer: The Agentic AI Breakthrough for Sustainable SitecoreAI Migrations
Speakers
Van Vuong — Director, Digital Platforms, Baylor Scott & White Health
Matt Vandermolen — Global Vice President of Digital Experience, Altudo
Summary
This presentation explored how agentic AI can accelerate Sitecore migrations while maintaining scalability, governance, and quality standards. The discussion included real-world healthcare insights and emphasized that organizations should focus less on whether AI-driven migration will happen and more on how to implement it successfully.
I was really excited about this one. I like to hear from other Healthcare companies (spoiler). Definitely be looking at the their journey and see what I can learn from them.
Some really good takeaways.
Not when, but how.
Look at other industries for inspiration, not healthcare sites.
Closing Remarks
Speaker:
Agata Nowakowska
Summary
The closing remarks reinforced Sitecore’s vision around AI-enabled digital transformation, composable architecture, and operational modernization. The event concluded with a strong focus on innovation, adaptability, and the importance of continuing collaboration within the Sitecore community.
Excited to get started.
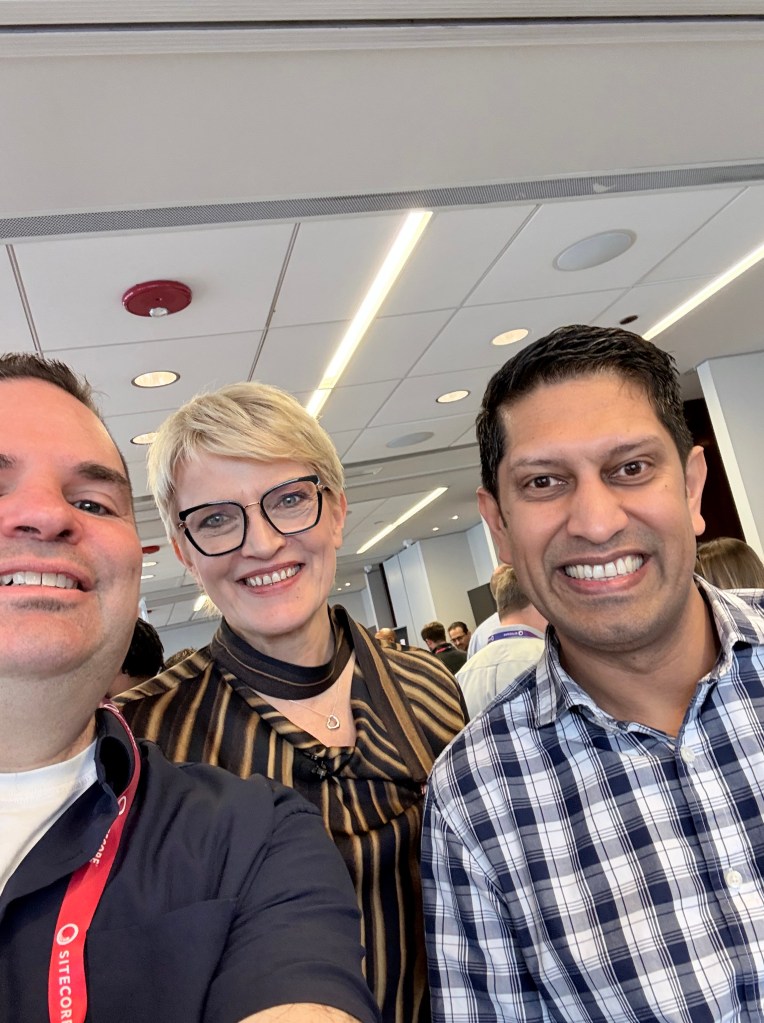
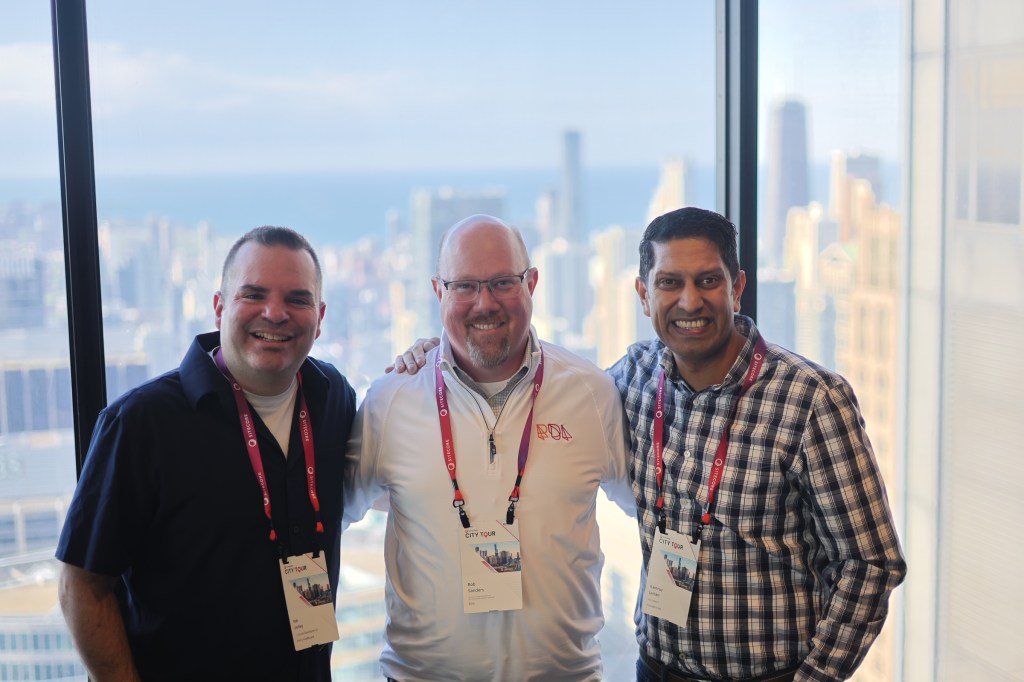
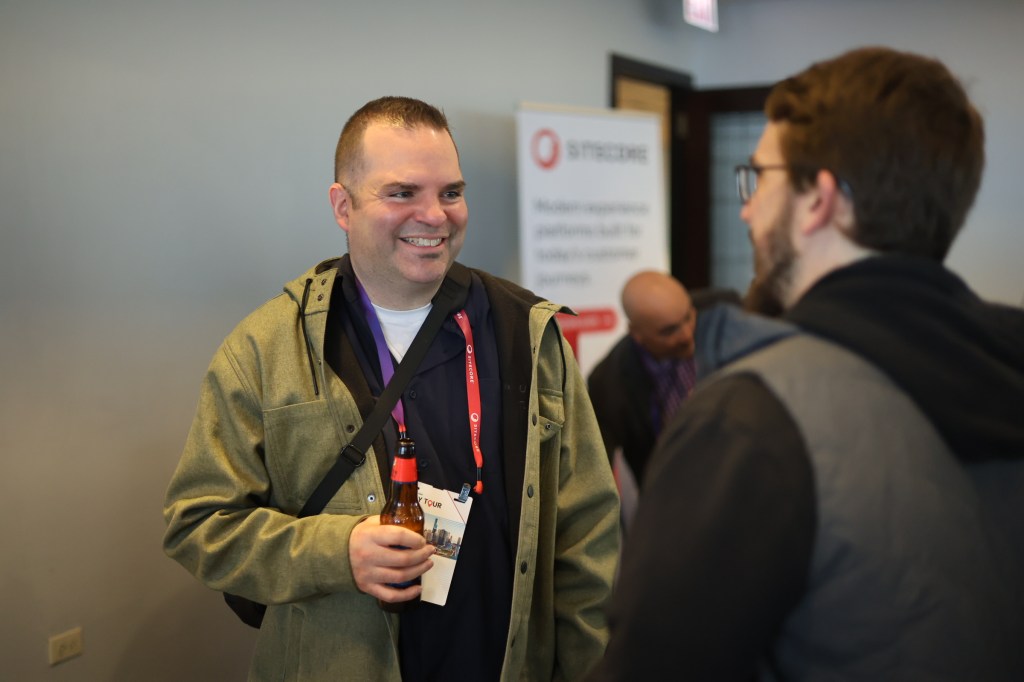
Sitecore Community
This is one of my favorite parts of these events. Thanks to Sasha and also my iPhone for various pictures. Dean Winchester snuck in a few of the photos. Fair warning I don’t take the best selfie photos (if you have seen the one with Elijah Wood) you know. Love the views of Chicago from the Willis Tower. Sears if you are old school.
Final Thoughts
The Sitecore City Tour came to me at a great time personally and professionally. I always love connecting with others in my industry and learning new things.
So if you made it this far I wanted to share my badge for this event. Excited about my new adventure starting in June. More to come on LinkedIn.
I always love attending and participating in these. I was excited for this one because I could finally get rid of some of the Sitecore swag that has been sitting in my office. I loaded my bag up and another container with what I could. I love these Rickshaw custom backpacks btw. So here is a summary of the meetup in photos.
Things started off with a Q&A. Water Cooler Unfiltered: Candid Conversation with Eric Stine, Eyal Altman & Jon Price (Eric Stine, Sitecore, Eyal Altman, Littelfuse, Jonathan Price, Americaneagle.com). This was a great session. Learned so much about the future of Sitecore and how AI fits in. I also got a question answered that I relayed to the person I was asking for.
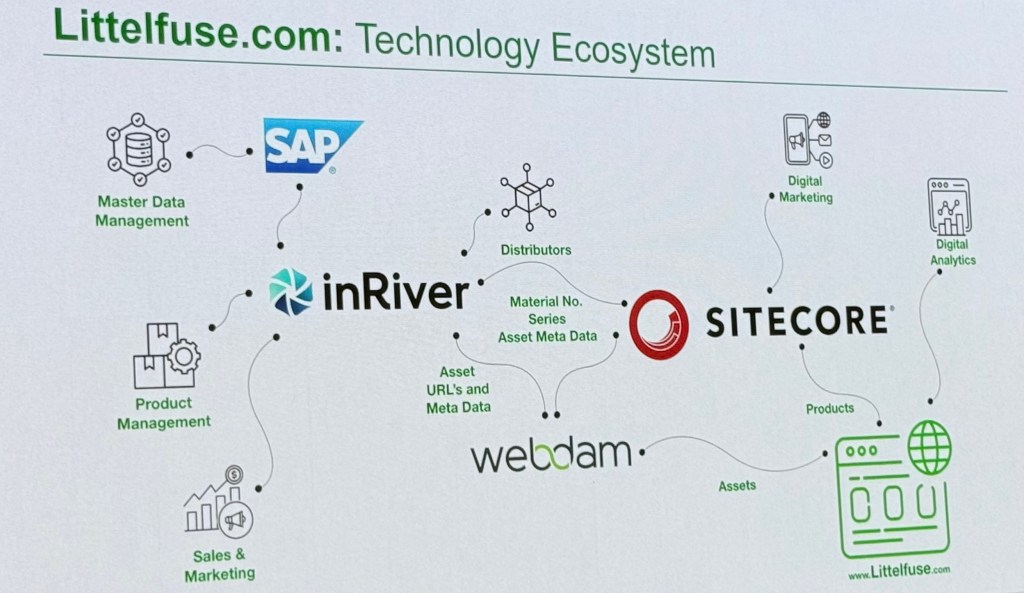
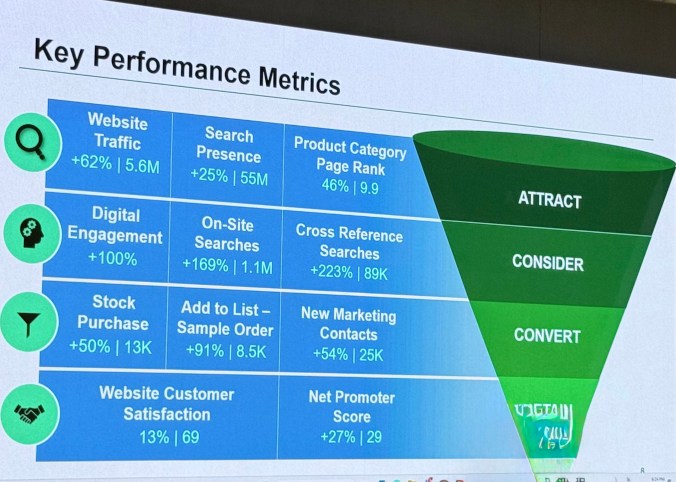
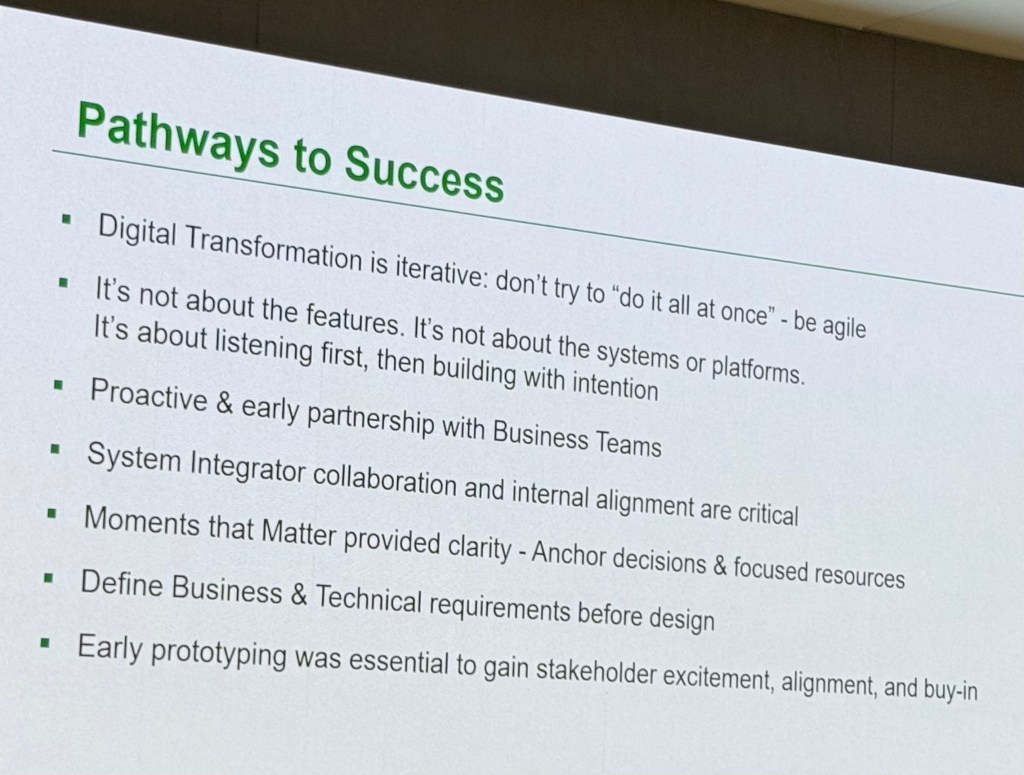
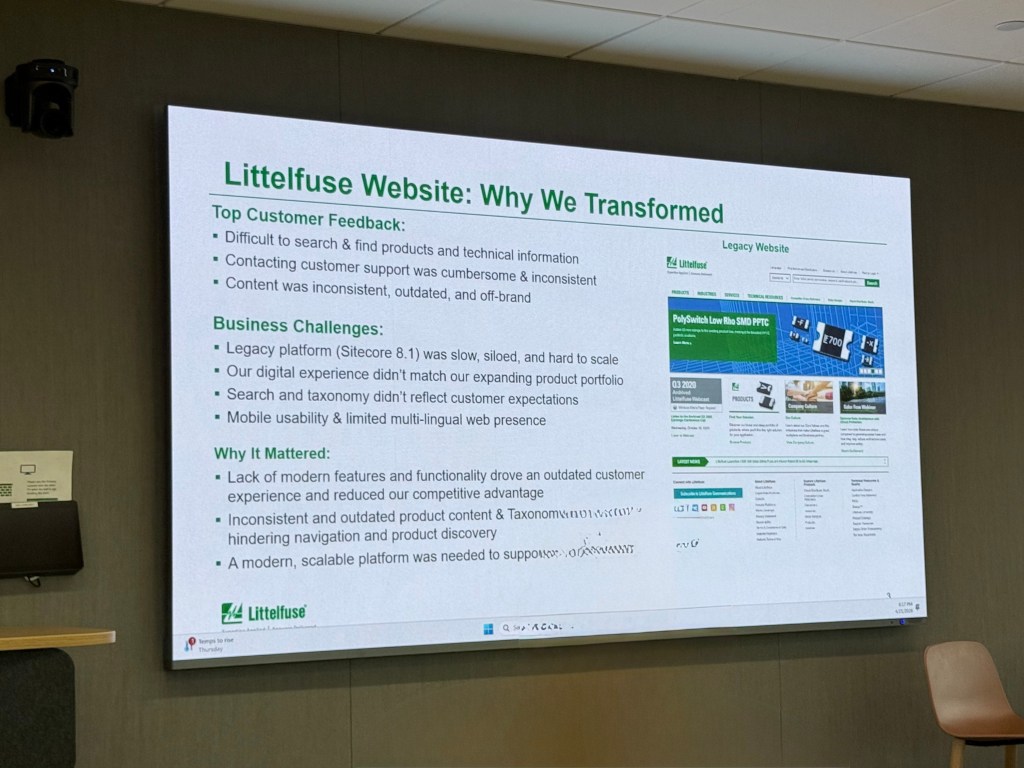
Next up was a session about Littelfuse’s journey. Always like seeing how things start and finish. Moments That Matter: How Littelfuse Transformed Digital Experience Through the Voice of the Customer (Sai Prasanna Pusarla, Littelfuse Josh Stanley, Sitecore Maggie Burke, Americaneagle.com)
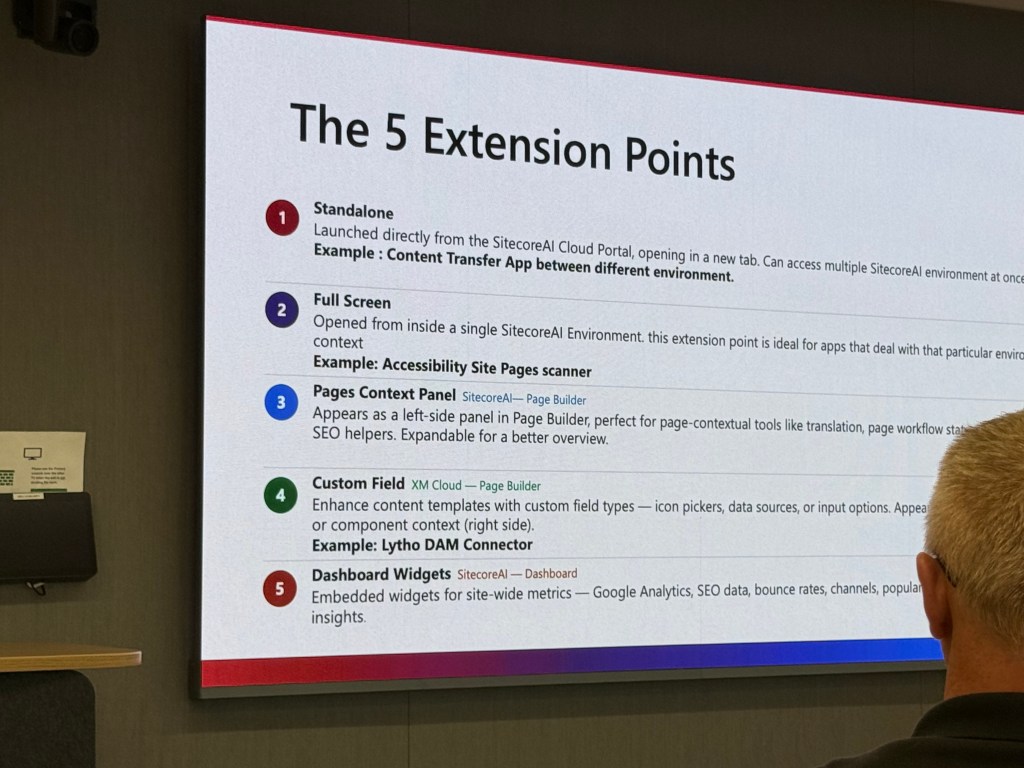
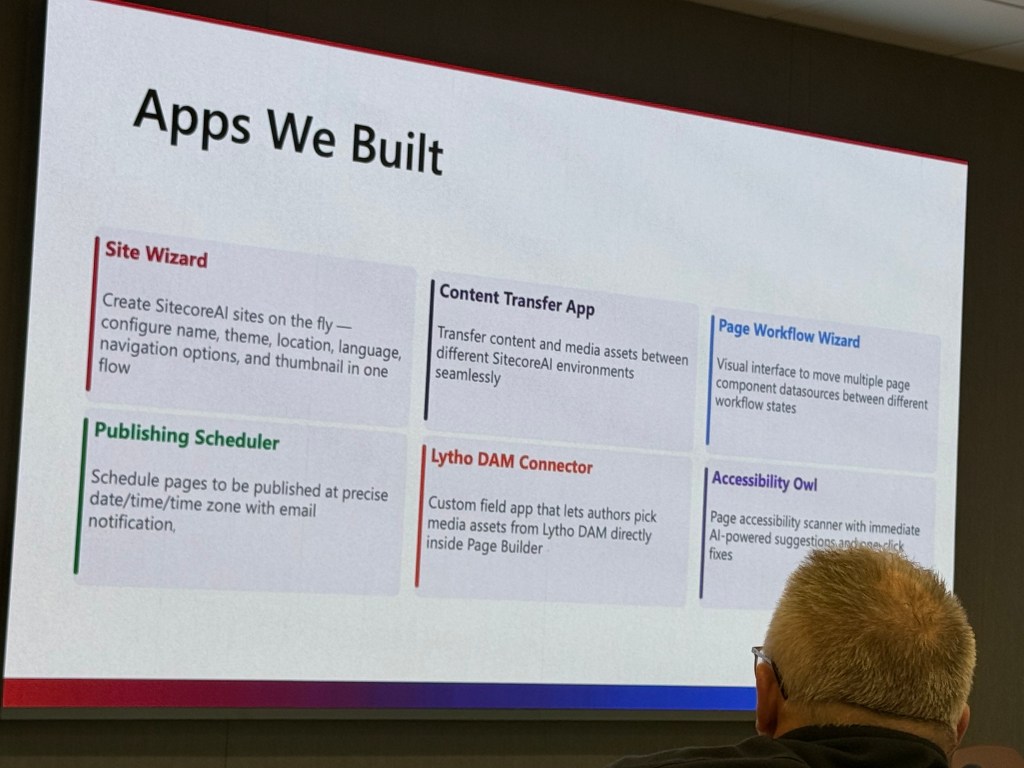
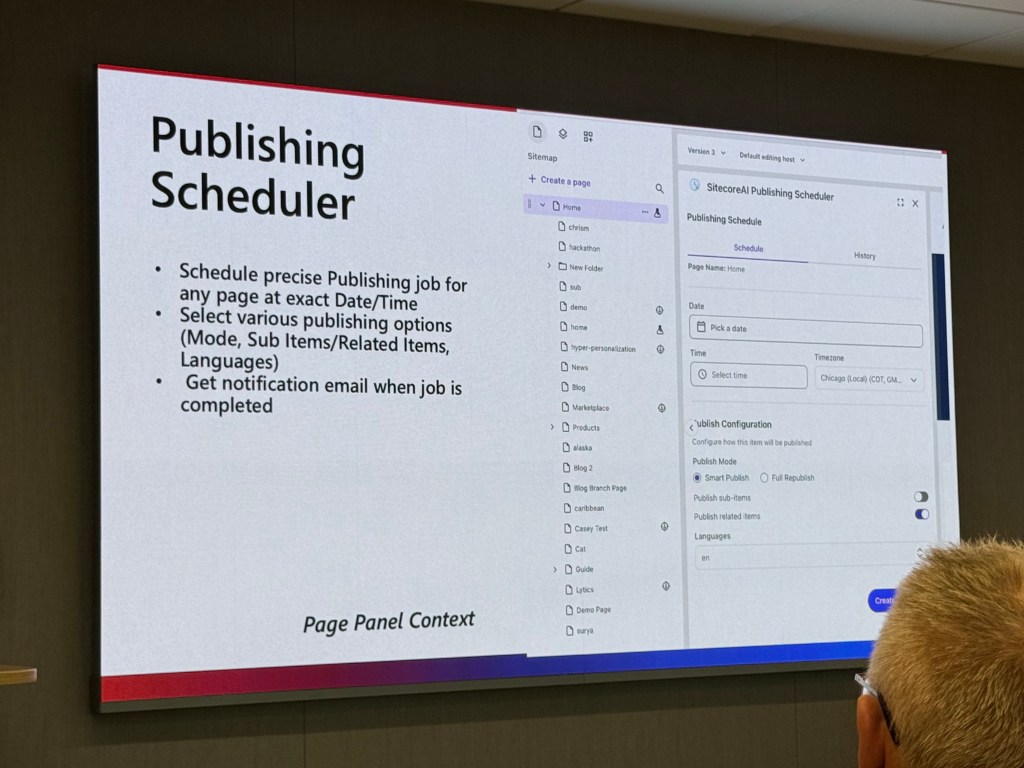
One of my favorite new Sitecore offerings is the marketplace. I love creating apps for it so was excited to learn some new things. The session presented was Extend your SitecoreAI Instance with Marketplace Apps (Ahmed Okour, Americaneagle.com).
Final Thoughts
I love being part of the Sitecore community. I am still looking for a new position and I am doing everything I can to stay part of it. It was great to reconnect with everyone. What I learned at the meetup I can use in my future role.
Several years ago I posted about essential tools for every Sitecore developer. A lot of things have changed since then. You can find that blog here if you want to go down memory lane. Fast forward to the current world of AI. A lot has changed since then, but not just because of AI. As it is inevitable, languages have changed and the way we code has. Here is my list of what I like to use in the current year. Let me know what you would add.
Visual Studio Code
VS Code has taken over a lot of functionality that we used to use with Visual Studio. With React components I have not gone back to using Visual Studio unless it is for MVC. Not only does VS Code work well with development environments it works well with opening text files that I used notes for in the past. It also works well on MacOS and seems to have no limitations.
Microsoft Copilot
If you needed a virtual developer that was a parrot on your shoulder this would be it. Using AI you get so many more features now in your development environment. Inlined code previews and contextual recommendations just to name a few. I believe Cursor has become popular, but I haven’t used that as much yet.
Your Preferred AI
ChatGPT, Claude, Gemini etc… are all battling it out. It is good to have some options to run things by. You will be surprised the different answers you get.
Sitecore Starter Kit
Every great project has to start somewhere. I always suggest starting with the starter kit. It not only benefits your architecture, but if you have any support tickets with Sitecore it will be easier for them to troubleshoot. You can find XM Cloud/SitecoreAI starter kit here.
Storybook
You don’t always have access to test something real time and/or you just want to see if things in theory will work. With Storybook as part of your React solution you can test your components before they are used anywhere else. A good example is if you don’t have access to the Content Hub at the moment and you just need to test if something will work. You can simulate the data and see the expected results.
Sitecore Serialization
Unicorn and TDS were both essential products for classic Sitecore sites. However Sitecore Serialization is the way to go for the smoothest transition to serialize your Sitecore items. It works well and easy to setup.
PowerShell
I can’t count the number of times I needed to use PowerShell. You can use it for so many things. From fixing data, to uploading a big set of images and creating reports. You can use AI to help you write scripts. Of course they should be tested with a small set of data. You can find more about it here.
Accessibility Checker
Having an accessible site is important. There are a lot of tools to use. One of the more popular ones is Siteimprove. Anyone should be able to browse a website no matter their special abilities.
AstroGrep
I may not use this as much as I did in the MVC world, but as your solution grows and serialized items this tool will come in handy still. Searching inside files is key when you need to find that hard to find bug issue. You can find it here.
Sitecore Icon Search
Always use this tool to find the correct icon for the right Sitecore item. You can find it here.
Sitecore Author Toolbox
Must have tool for anyone that uses Sitecore. Many great features with this that will make the user experience better. I like dark mode and rearranging how tabs appear. You can find it here.
Sitecore Community
Saving the best tool for last. I dare you to find a better community that helps each other out. Here is a list of Sitecore community sites to join.
Join the Sitecore Slack community. You can find it here.
Sitecore Reddit channel has all the latest blogs and news. Find it here.
Follow and like Sitecore on LinkedIn. Find it here.
Find a local Sitecore meetup group. They also have online ones as well.
Wrapping Up
This list will keep changing, but one thing is for certain. AI is a great tool for developers, but will not replace them. You need to make sure code is clean, scalable, secure and ready for production. Code reviews and thorough developers are needed more than ever. So what tools do you use?
Within the last year I passed the XM Cloud exam. When it was announced that XM Cloud would become SitecoreAI I was wondering if I would need to take the exam again. The answer was yes. Now I will say it was close to the XM Cloud exam, but somewhat different. I believe there were more questions. Here is my quick summary to help you pass. On a side note I did one for the Content Hub exam a few years back. You can find that here.
Use a Sandbox if available.
If you have access to a sandbox go through the steps of creating a SitecoreAI site and setting up a development environment. This will help make things more clear to see the actual process of what is involved. Get a site up and running is key.
Take notes and make a study guide. Even create your own quiz. If you don’t pass the exam the first time quickly write down what you struggled with and put that in your study guide. Using the link above for SitecoreAI you should be able to come up with a great study guide.
Understand Sitecore basics.
Templates how inheritance works and how they are defined.
Understand how standard values work and why you should use them.
Understand the presentation layer and the difference between SXA and non-SXA sites.
Understand how deployments and archtecture work.
You will need to understand how code goes from your local environment to the cloud. Understanding basic integration and Git hub is important. You are already probably using it, but brush up on CI/CD deployment. The deployment setup for SitecoreAI is different than traditional MVC. Make sure you know environmental variables needed and how new sites are provisioned.
Learn how Sitecore serialization works. Make sure you get to know the parameters needed and why such as path. Look at the starter kit and how that is setup.
Use multiple choice strategies.
This is always better said than done. However you have four answers to choose from. I found at least two answers didn’t make sense. So I tried to eliminate those. The last two you really need to figure out which one the answer should be. Look into the question for help, but also look at other questions that may also give you clues. At the end of the day if you can’t decide, choose the one that makes the most logical sense.
Breathe and Relax.
I am getting better at this. I tend to be nervous going into any test I take. I soon relax as the test goes on. I tend to get a little anxious when I don’t have a clear answer to questions. Just breathing and relaxing really does help. Just don’t breathe too loud because the microphone may pick it up and the exam could get paused. The answer is there, just reread the question and again make the logical choice.
Conclusion
No matter what happens don’t give up trying. If you fail, learn from it and don’t be worried about taking the exam again. I always recommend taking the training and exam prep offered by Sitecore.
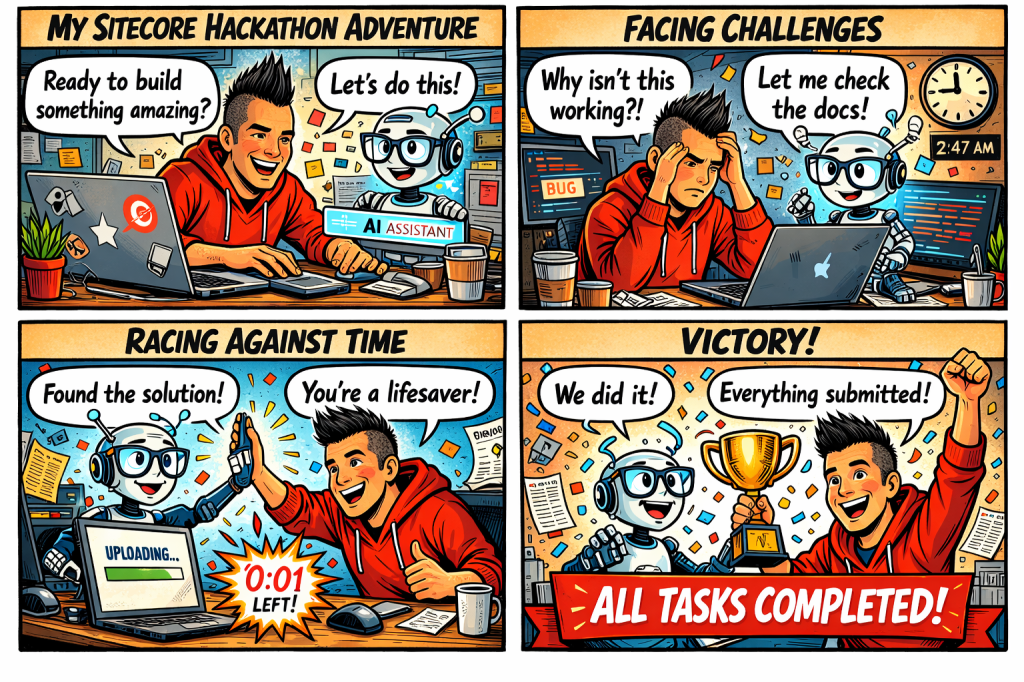
I think I lost track of how many hackathons I have participated in. Each one is different win or lose. This year’s was no exception. Although I was doing this solo I had AI helping me when needed for the first time. It was great to get the additional help. No AI is not replacing developers. However as developers though we need to embrace it as an another tool.
The following were this year’s categories.
1. Best Marketplace App for Sitecore AI – Build something publishable. Not just a demo.
2. Applied AI Within the Sitecore Execution Pipeline – Demonstrate how AI can be embedded within Sitecore execution flows to improve quality, governance, personalization, or performance.
3. Best Tool Supporting Sitecore Development (Not Built on Sitecore)
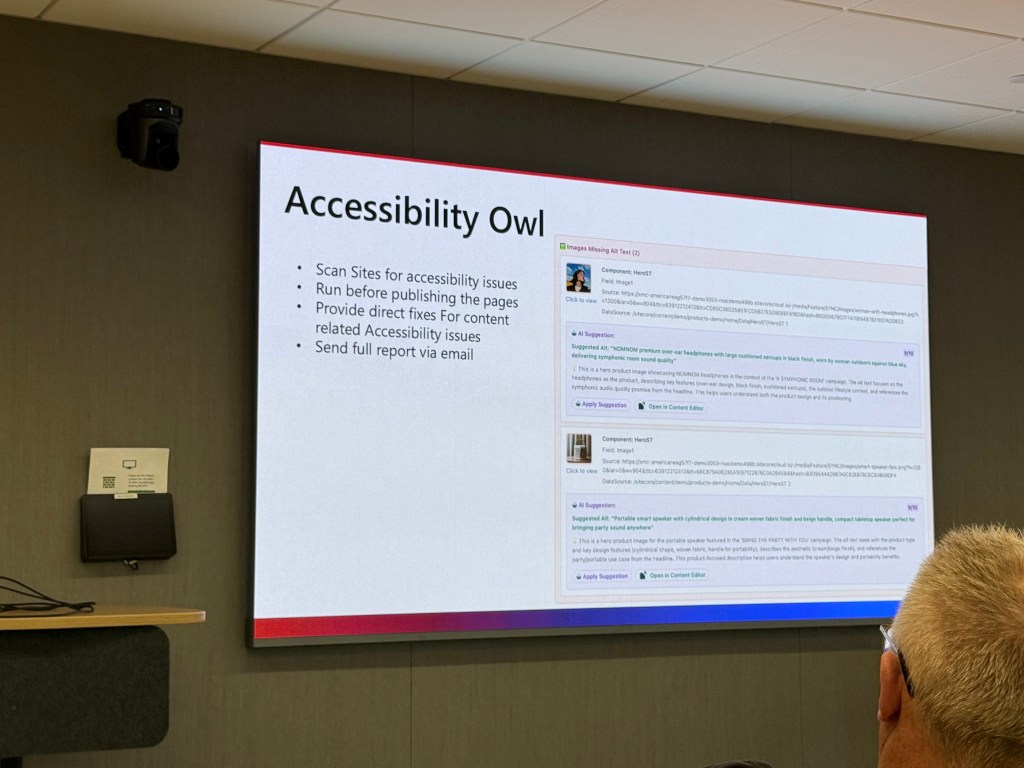
I chose 1. Because for quite a while I had an idea of a great marketplace app. It would be similar to something I did in the content hub, but with the flexibility of a marketplace app I could do more. To premise this I think it is important for SEO considerations for websites, but more importantly is accessibility. I recently did training for accessibility. It was very eye opening and I learned a lot of things I did not consider before. So my goal was to make something useful for strategists, marketers and content editors. Here is kind of how it went. Comic strip created by AI.
Hour by Hour
Here is a good breakdown of the hours spent. I think I am finally caught up with sleep although daylight savings time did not help.
1-4 Make sure access rights is working in the repository and get the marketplace starter kit. Merge the code needed into my repository.
5-8 Got things working, but not sure if it is good enough. I think the SEO suggestions should also include accessibility checking and suggestions.
9-10 Worked with AI to help me structure my code better. While doing this it knew what I was doing somehow and offered me suggestions to add the app to help with what I wanted to accomplish.
11-14 Looking good and got things working. I really like how it turned out.
15-24 Off and on getting documentation right and making sure I didn’t miss anything. Made a few last minute changes to the documentation and code.
What I Discovered
No matter the plan and the idea you have there is always something you will encounter that might derail them. I have used OpenAI before in React components, but not in a marketplace app. I had to learn how to incorporate it so it would work within the marketplace. It also had to be much cleaner. No POC, it needed to work.
Ok got things working, but let’s face it you need something that stands out. I wrote down all the stuff I wanted to add. Being solo has its drawbacks because you don’t have a human to bounce ideas off of. So I decided to use AI to bounce some questions off of. It was like having a virtual partner. I wasn’t so lonely anymore. 🙂
Structuring your code is important. I am coming from an MVC background so there is some differences in my opinion on how you should structure the code. Similar to going from one car to another. They are both cars, but two different cars.
AI can help you document and format your code. This is definitely something that helps make sure things are clean and documented. Always double check comments are correct though.
The single most important thing is know your audience. Not every app is for you. I had to think how someone who would be using this would want to use this. It needed to be helpful and really add some value.
The Big Reveal
So here is the big reveal. Screenshot and video below. I chose to do a panel app that appears in the page editor. Using AI SEO suggestions were generated along with accessibility issues.
So it was a great relief getting something handed in on time. I don’t know what the results will be, but I feel like lessons learned is the most important win you can have. I got know something I plan to use more in the future. AI is here. A great tool when you need help.
In my previous blog I talked about how to get started with external components. One of my goals when utilizing them was to be able to take data from an asset and use that in a component. The possibilities you can do are endless. I am going to dive into an example of a working component that will receive a value from CH and display it.
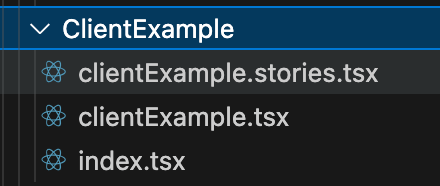
Let’s start with the following. In this example we will see files with the .tsx extension.They are typescript files that contain JSX syntax.
Starting with the clientExample.tsx you will see the following code. See comments in the code for a breakdown of what the syntax does.
//Helper Libraries
import { entityLoadConfigurationFromOptions } from "@/lib/data/dataHelpers";
import type { IModuleProps } from "@/lib/types";
import { useEffect, useMemo, useState } from "react";

//Sets the property and value that will be received. In this case you can send any property value as long as it is a string.
export type ClientExampleConfig = {
  propertyName: string;
};

export default ({ createClient, config, options }: IModuleProps<ClientExampleConfig>) => {
  const [propertyValue, setPropertyValue] = useState<string>();

//The createClient is provided by the Content Hub to communicate with the component.
  const client = useMemo(createClient, [createClient]);

//This code will only load the configured property. Important not to load everything for better performance.
  const loadConfiguration = useMemo(() => entityLoadConfigurationFromOptions({ properties: [config.propertyName] }), [config.propertyName]);

//Fetches the entity. When the entity changes the model loads. Gets the property value and stores it in state.
  useEffect(() => {
    (async () => {
      if (!client || !loadConfiguration || !options.entityId) setPropertyValue(undefined);
      else {
        const entity = await client.entities.getAsync(options.entityId, loadConfiguration);
        setPropertyValue(entity?.getPropertyValue(config.propertyName) as string);
      }
    })();
  }, [client, options.entityId]);

//This displays the property value. This part should look somewhat familiar as it uses HTML.
  return (
    <dl>
      <dt>{config.propertyName}</dt>
      <dd>{propertyValue ? propertyValue : <em>Not set</em>}</dd>
    </dl>
  );
};
Tying this together with the index.tsx you will see the following code. See comments in the code for a breakdown of what the syntax does.
//Uses a helper library to create
import createModule from "@/lib/createModule";
//Imports the React component and adds the configuration type it expects.
import ClientExample, { ClientExampleConfig } from "./clientExample";

//These lines bring it all together to create the module.
export default createModule<ClientExampleConfig>(
props => <ClientExample {...props} />
 );
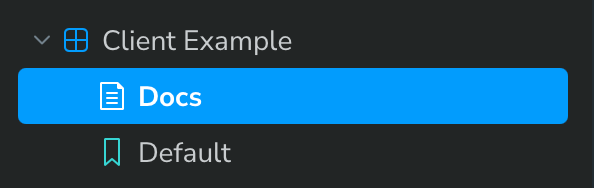
As I would suggest to everyone Storybook is a powerful tool that I highly recommend to test components. Let’s take a look at clientExample.stories.tsx.
//Defines component story and variations.
import type { Meta, StoryObj } from "@storybook/react";
//Defines the configuration.
import ClientExample, { ClientExampleConfig } from "./clientExample";
//Helpers that simulate Content Hub behavior.
import { CreateMockEntity, CreateMockModuleProps, CreateMockQueryResponse, MockApiHandler, MockBaseUrl, MockEntityId, MockRoutes } from "@/lib/mockData";

//MSW = Mock Service Worker
//Intercepts HTTP calls in the browser and replace it with a mocked responses.
import { http, HttpResponse } from "msw";

//These can be set to whatever values you want to test.
const mockedPropertyName = "title";
const mockedPropertyValue = "Hello World!";

//Registers the story and supplies the default props.
const meta = {
  title: "Modules/Client Example",
  component: ClientExample,
  args: {
    ...CreateMockModuleProps<ClientExampleConfig>({ propertyName: mockedPropertyName }),
    options: {
      entityId: MockEntityId,
    },
  },
  tags: ["autodocs"],
} satisfies Meta<typeof ClientExample>;

export default meta;
type Story = StoryObj<typeof meta>;

//Defines the story
export const Default: Story = {
  parameters: {
    msw: {
      handlers: [
        MockApiHandler,
        http.post(MockRoutes.entities_by_query.href, () => {
          const entity = CreateMockEntity({ [mockedPropertyName]: mockedPropertyValue });
          return HttpResponse.json(CreateMockQueryResponse([entity]));
        }),
      ],
    },
  },
  args: {},
};
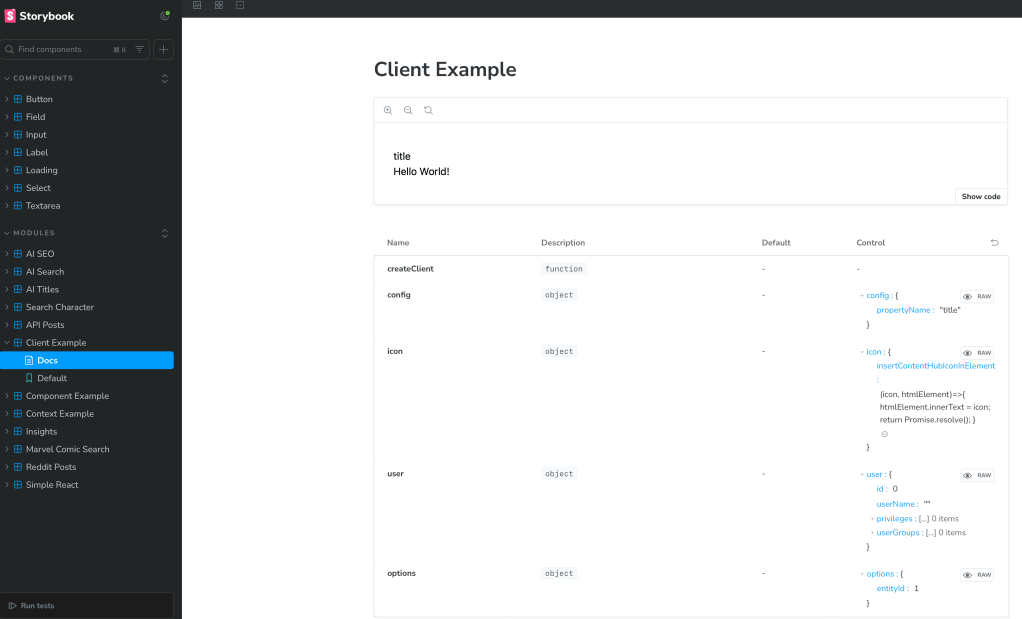
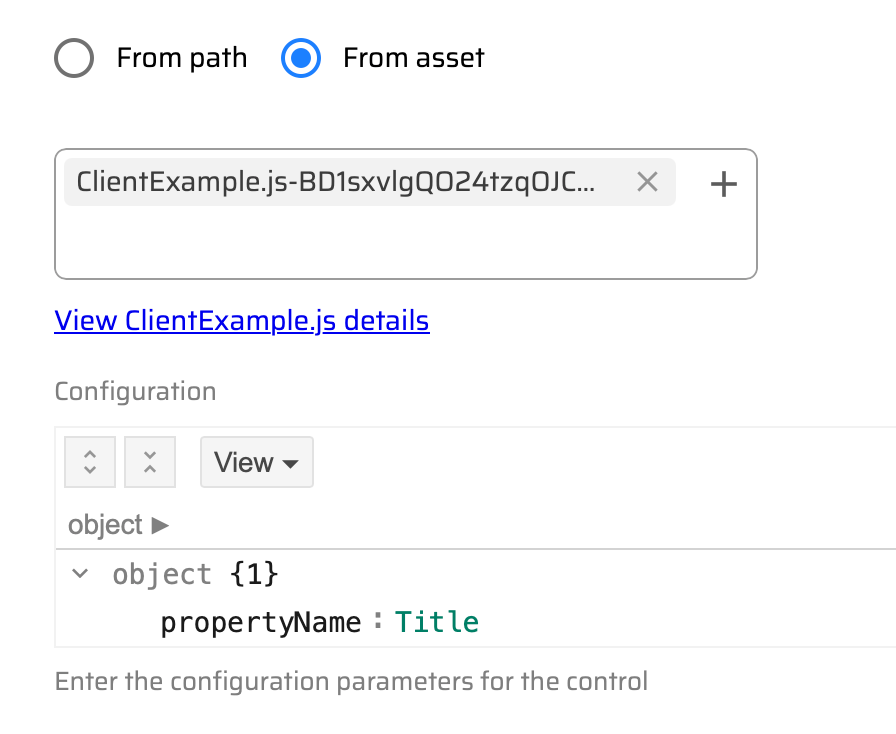
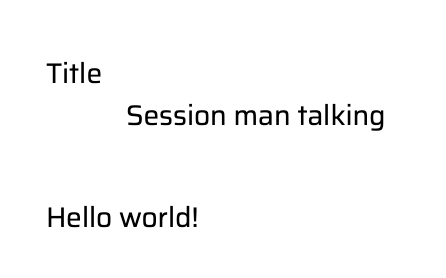
As stated in my previous blog the title and any asset property can be passed into a React component as you see below.
For this however we will run a quick test in Storybook from the command line in the project (npm run storybook;). You can see the results below:
Wrapping Up
I always like to give people the basics when it comes to getting started. I hope this answers some of your questions on the structure of a React component and how it is used with Sitecore’s Content Hub. Let me know if you have any questions. You can also refer back to my previous blog. Now boldly go and create some new external React components!
One of the things I like about the Content Hub is there is so many ways to customize it. Last year I wanted to be able to call an API and display data on assets. It was suggested to use React Components. It has been over a year of using them and doing some really cool things with them. I have presented what I learned at several meetups. With this blog I want to show how you can get started using them.
Why Use Them?
With all the customization you can do the with the content hub why would external components be needed? The answer is simple. So you can extend the functionality of the content hub and utilize external resources in doing so. The possibilities are endless as you can create some really cool things with React components. In this blog I will go over external component creation at a higher level. In future blogs I will showcase more detailed code.
Storybook
As I started the React components journey I learned how to implement and use Storybook. I believe this is a critical tool as it allows you test React components without actually integrating with the systems you are using them with. In the screenshot below you can see a list of components I used Storybook to test and what an example screenshot looks like.
Basic Structure
I will keep this simple and show you how a simple React component would work. Keep in mind this is part of a starter kit I used and had a lot of things setup already. I simply had to create the component. I will link to the starter kit in this blog post.
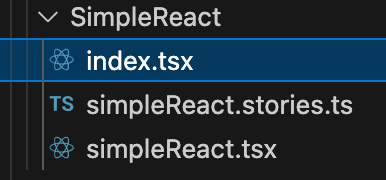
Let’s start with the structure. In this case we will have three different files.
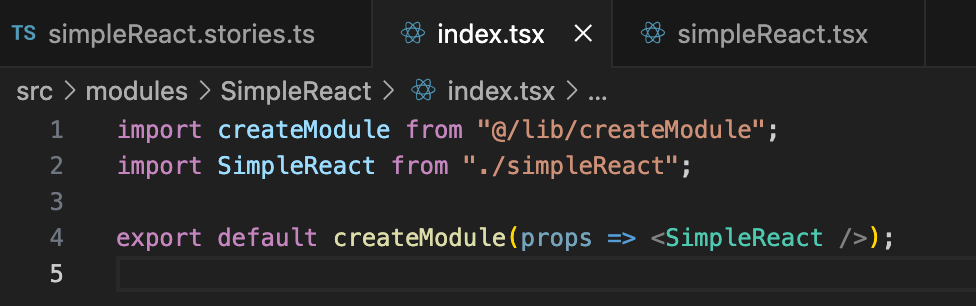
The index.tsx file is what brings this together. You will use this import libraries and call the tsx file which typically contains the output.
As you see below this tsx file simply exports HTML. You can do many things in this file such as call an API and import data. The data then can be used in an HTML document you return.
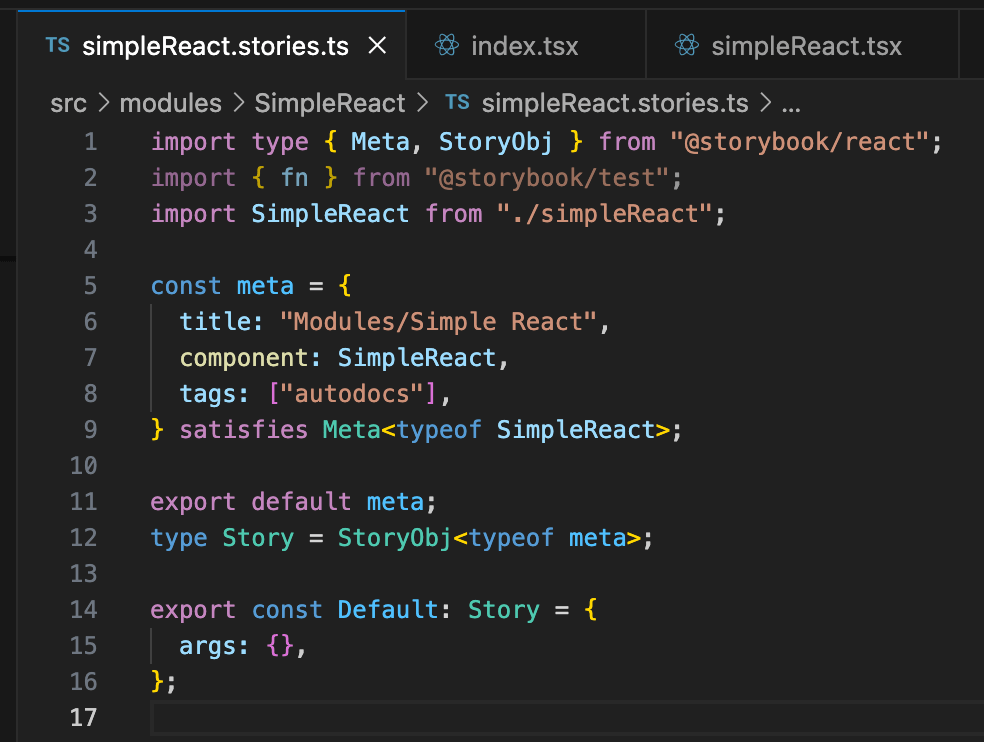
The stories.ts file is use to run with storybook. You can use it to not only call the react component, but you can pass parameters as well.
When this is run in Storybook you will see the following output.
In the links (Example Repositories and Starter Kits) section in this blog to get you started you can navigate to the documentation on how to create bundles. You will need these in order for the Content Hub to run your code. It is basically a compiled JS file with all of your code and libraries needed.
Hosting vs Uploading Bundle
In order for content hub to use your React component you will need to make a bundle. There are instructions in the starter kit to do this that I will link to in this blog. After you do create the bundle you can choose to upload it as an asset to content hub or host it in your own website.
For hosting the bundle you can have the content hub host it by uploading it as a portal asset. You can find the link to Portal assets under the settings.
You can upload your bundle with different versions as needed.
Under pages I will usually add the bundle there.
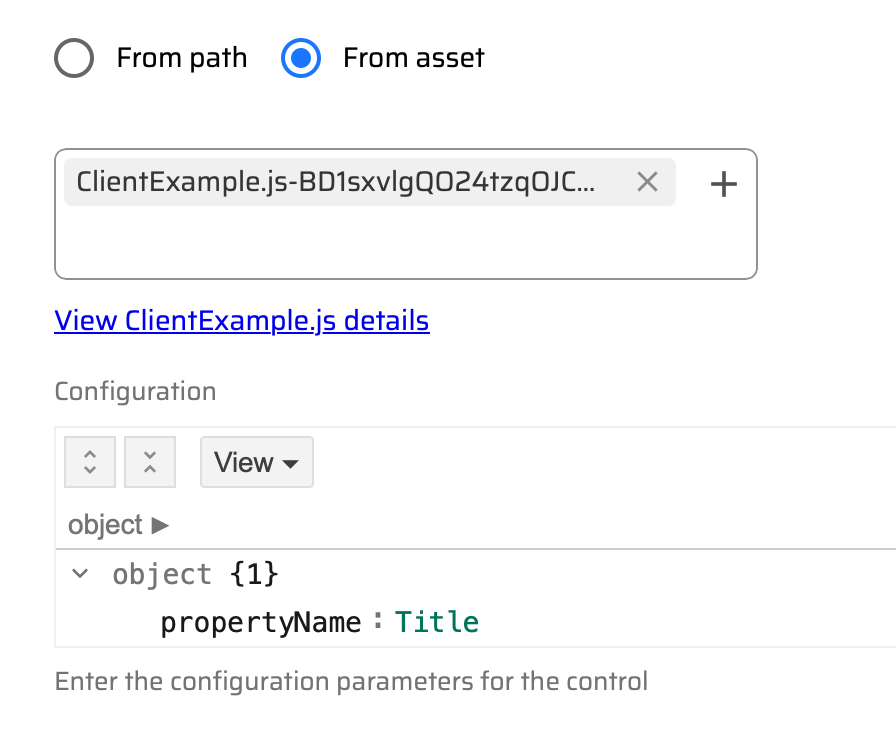
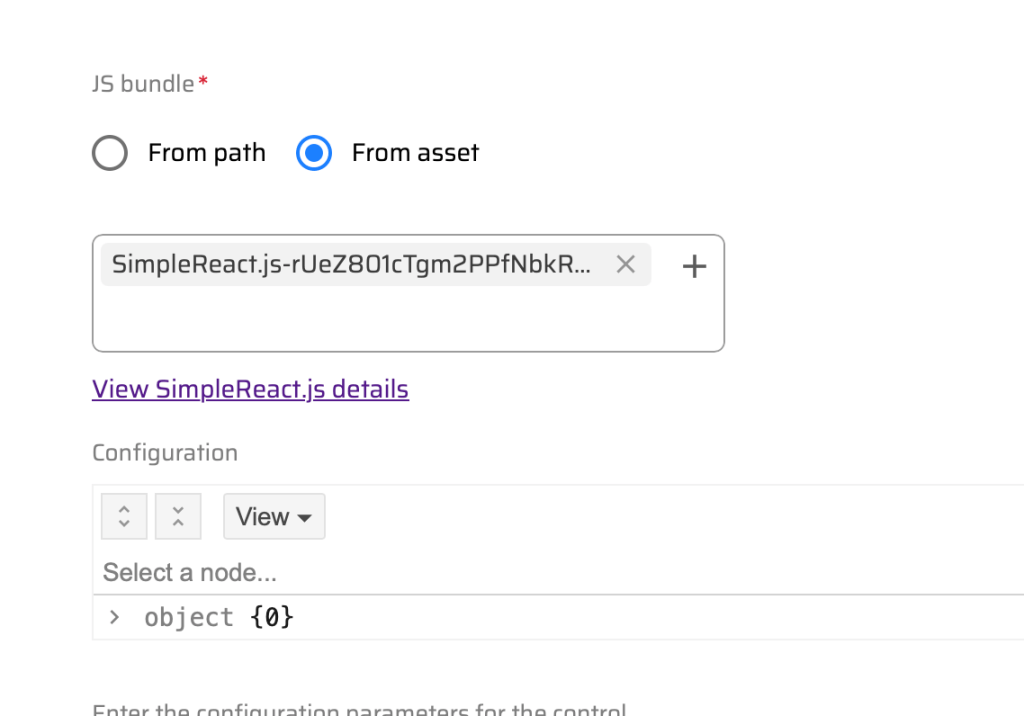
When clicking on an external component such as SimpleReact you will see the following.
From asset will allow you to link to the page assets in the content hub. Using the From path will allow you to link to a website hosted bundle.
I will talk about this more in a future blog. In the object section you can pass properties from the content hub to your React component. This is very powerful as it allows you to interact with the asset.
I will get into the more advanced external components later, but here are some simple ones on the asset pages rendering.
Example Repositories and Starter Kits
Below you will find different links to get started making your now React external components for the content hub. I will dive into more detail of some of the more complex ones I created in future blogs.
I realize the Symposium is over and I am little behind. I need a little recovery time after the party at Universal so had to wait until I was home to do this one. It didn’t help the Wi-Fi was really bad at the hotel so not all my photos were synced yet across my Apple devices. I will have a Symposium recap with what is coming out in the near future. For now here is Day 3 in photos.
The presentation on .NET Core in DXP was a great surprise and looking forward it. Many clients are just not ready for SaaS.
Great presentation on customizing a Marketplace app with a traditional XM marketplace module.
Now for one of my favorite parts. The Hackerspace! This was so fun and I am excited to show my team.
Scored some cool swag.
Ended the day at Universal Studios.
There is probably something else I am forgetting, but I will remember later.