#Sitecore Forms Country DropDown List with Geo IP Country Lookup

I needed a Sitecore Form with a country dropdown list. It would also have to default to the country that Sitecore’s Geo IP would detect. To accomplish this I had to do the following steps.

Create the class

The class inherits from the DropDownListView Model and implements the following code. The list of the countryselectoritems is what the view (later step) will use to populate the dropdown list.

This is the what the countryselectoritem is defined as:

 public class CountrySelectorItem
 {
      public string CountryCode { get; set; }
      public string CountryName { get; set; }
      public string SelectedItem { get; set; }
 }

The code is as follows:

using Sitecore.Diagnostics;
using Sitecore.Data.Items;
using Sitecore.ExperienceForms.Mvc.Models.Fields;
using System.Collections.Generic;
using static Supernatural.Feature.WhitePaper.Models.CountryDropDownModel;

namespace Supernatural.Feature.WhitePaper.FormFields
{
    public class CountryDropDown : DropDownListViewModel
    {
        protected override void InitItemProperties(Item item)
        {
            Assert.ArgumentNotNull((object)item, nameof(item));
            base.InitItemProperties(item);
        }

        protected override void UpdateItemFields(Item item)
        {
            Assert.ArgumentNotNull((object)item, nameof(item));
            base.UpdateItemFields(item);
        }

        public List<CountrySelectorItem> Countries()
        {
            List<CountrySelectorItem> countrylist = FormHelper.GetCountryList();           
            return countrylist;
        }
    }
}

The function FormHelper.GetCountryList() can be implemented any way you want. I am using Sitecore XP so there is a country list available. I simply build a list of CountrySelectorItems. One of the important parts of the code is the Geo IP country retrieval. We will retrieve the country from the IP address using Sitecore’s Geo IP lookup and set the SelectedItem to that country. That way when we render the dropdown we know which country value should be selected (aka defaulted). Here is one example:

 public static List<CountrySelectorItem> GetCountryList()  
        {
            List<CountrySelectorItem> countrylist = new List<CountrySelectorItem>();

            Database contextDB;

            if (Sitecore.Context.Database.Name == "core")
            {
                contextDB = Sitecore.Configuration.Factory.GetDatabase("master");
            } 
            else
            {
                contextDB = Sitecore.Context.Database;
            }

            Item countriesfolder = contextDB.GetItem(LanguageCountry.CountriesFolder);

            string activecountrycode = GeoIpHelper.GetGeoIpCountry();

            foreach (Item country in countriesfolder.GetChildren().Where(a => a.DoesItemInheritFrom(LanguageCountry.CountryTemplate)))
            {
                string countrycode = country.Fields[LanguageCountry.Fields.Country].Value;
                CountrySelectorItem countrySelectorItem = new CountrySelectorItem();
                countrySelectorItem.CountryName = country.DisplayName;
                countrySelectorItem.CountryCode = countrycode;

                if (!string.IsNullOrEmpty(activecountrycode) && countrySelectorItem.CountryCode.ToUpper() == activecountrycode.ToUpper())
                {
                    countrySelectorItem.SelectedItem = countrySelectorItem.CountryCode;
                }
                countrylist.Add(countrySelectorItem);
            }

            return countrylist;

        }

Create the View

The view is simple. I took an existing view from a list rendering and used that as a starting point.

@using Sitecore.ExperienceForms.Mvc.Html
@using Supernatural.Feature.Media.Models
@model Supernatural.Feature.Mmedia.FormFields.CountryDropDown

@{
var countrylist = Model.Countries();
}

@Html.DisplayTextFor(t => Model.Title)
Select Your Country @if (countrylist != null) { 
foreach (CountryDropDownModel.CountrySelectorItem countryselitem in countrylist) 
{ 
if (countryselitem.SelectedItem == countryselitem.CountryCode) 
{ 
<option class="flags-@countryselitem.CountryCode.ToLower()" selected value="@countryselitem.CountryCode">@countryselitem.CountryName</option> 
} 
else 
{ 
<option class="flags-@countryselitem.CountryCode.ToLower()" value="@countryselitem.CountryCode">@countryselitem.CountryName</option> 
} 
} 
}
@Html.ValidationMessageFor(m => Model.Value)

Sitecore Item Setup

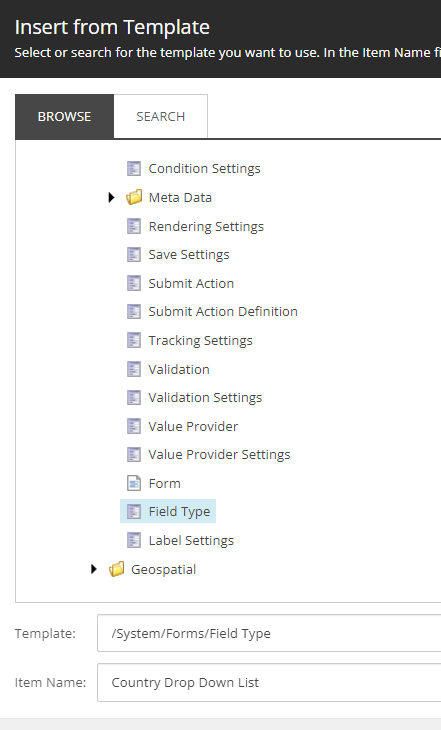
In /sitecore/system/Settings/Forms/Field Types/Lists you will see several list types. This is where I added the new list type. I chose the Field Type template under /System/Forms/Field Type. I called it Country Drop Down List.
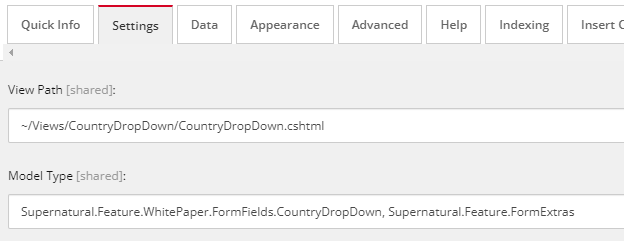
Under the settings I put the following. The rest I used the default.
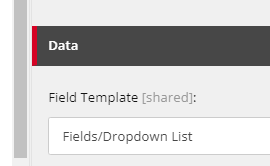
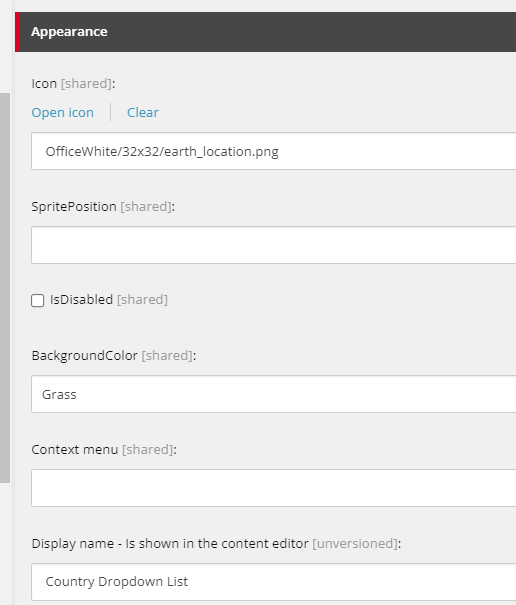
Under the appearance section. I chose Icons that match what the other lists had. Once important not is to make sure BackgroundColor was set to Grass to blend in with the other list field types.
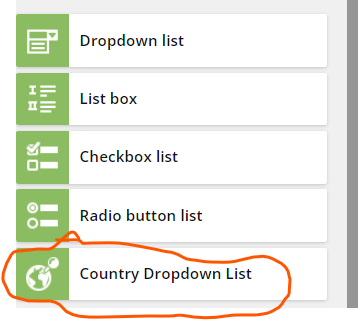
When you go to the Form Builder you will now see the Country Dropdown List as selection.
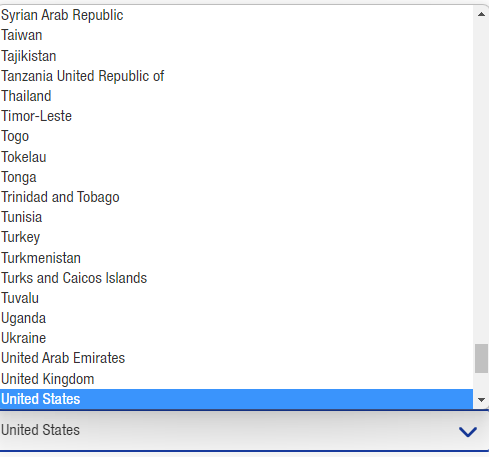
This is what the form will look like when the field is rendered. I clicked the down arrow in this example and US was the default.
That is it. I may include this as a separate install in the near future. I will update this blog if I do.

Thoughts On The #Sitecore Symposium 2022 #SitecoreSYM #SitecoreMVP @RBAConsulting

It took me a bit to gather my thoughts and get back to normal at the Symposium. I was pretty excited about all the new things presented and can’t wait to start implementing the new stuff.

The Beginning

Not much to report. Got there and registered and met my RBA co-workers for the first time in person and some other fellow Sitecore lovers. It was great to not be on Teams/Zoom and interact. We were all probably thinking I thought you were taller/shorter. Well maybe that was just me. Had a great night at the RBA dinner and then it was back on the train home.

The Sessions

Boarded the train with my new RBA flag and made it in time for the opening. It didn’t disappoint. It was a great way to start things off. Got to take some selfies with co-workers new and old. This year’s them for the Symposium was Meet Every Moment. Nice! Here are some of my favorite sessions.

Things really started moving fast on Wednesday. First got to the Symposium just in time to see Mindy Kaling. I am a big fan and my daughters are too. She had great advice that I passed on to my daughters.

One of the sessions I attended was Building the perfect composable tech stack. Some of the things I learned:

  • Look at best tech despite what Sitecore owns.
  • Fit the right stack for the customer.
  • The tech stack is constantly changing.
  • Tech stack should be flexible.

I also saw From discovery to live sites: A multisite solution at scale using SXA for Central Garden & Pet. Altudo using their OneWeb solution was able to solve a complex issue of having several multi sites.

Next it was Evaluating legacy to composable: United Airlines’ journey to futureproof development. Love the roadmap of what they came up with and will help knowing what to leave in the past and move forward with.

Of course I got to present with one of my co-workers and my co-workers presented as well.

Pictures courtesy of RBA Consulting.

The Party

The party for this year’s Symposium was at the Museum of Science and Industry. I haven’t been there in over 20 years so it was great to see it again.

The MVP Summit

The MVP Summit started with a round table discussion. Got some great insights on E-Learning and CDP. At night we all went to the Punch Bowl. It was great catching up with everyone. We go the inside scoop of a lot things that I can’t share yet.

One of the things I do want to mention is Content Hub One. I am very excited about this new product offering. I think it will be an important piece for new and old clients that want to get their content in the cloud.

The Beanbag Chairs

Well I have been wanting a bean bag chair for a long time. There were tons of them at the Sitecore Symposium. So for my birthday this year I asked for one. It looks nice with my Sitecore pillows and MVP plaque. I think I will keep adding to my collection of pillows.

Final Thoughts

Composable and Cloud are the first words that come to mind when I think of the 2022 Symposium. It comes as no surprise as that is where things are not only going that way for Sitecore, but the IT industry in general. Personalization is probably the best thing you can do to get the most use for your website. With CDP and Personalization it is easier than ever. Hopefully we will see more clients take advantage of that so the can “Meet Every Moment”. The roadmap is there to do everything now it up to us to drive it.

Da #Sitecoresym 2022 Chicago Style Guide From a Illinoisan

The Chicago Super Fans have spoken.

Hard to believe that the Sitecore Symposium will take place in Chicago this year. Being a Chicago native (suburbs of Chicago) I am obviously pretty excited about this. Not only do I get to take the train to the Symposium I was blessed to be picked as a speaker. To top it off I get to meet some of my coworkers in person. With this blog I hope to give someone an idea of what it is like at the symposium mixed in with a little Chicago style.

Dress for the weather. It’s October in Chicago. There are days you can wear shorts, but the temperature goes up and down quite a bit. In the mornings it is cold, but by the afternoon it warms up.

Make sure you stop and visit every sponsor. Don’t forget to thank them. In Chicago we try to be polite whether we mean it or not.

No doubt the symposium has some great food. Being in Chicago you will find we have some of the best food. Especially our pizza and hot dogs (no ketchup is allowed on hot dogs, don’t even ask). Everyone else’s is inferior.

Take it all in. You are at the Sitecore Symposium in Chicago! Grab as many buttons as you can for your lanyard. Network, Network, Network. Find some new friends to check out the museums, get some shopping done at Michigan avenue and check out the bean.

Chicago is rich in history. From Al Capone to the great Chicago fire there is not shortage of cool, strange and mysterious history here. I suggest reading up on it. We also have had a lot of movies filmed here such as Batman (Christian Bale version) and Transformers. Let’s make history at they Symposium!

Did he really say that?

So there is my short take on all of this. I am proud of where I grew up and live if you can’t tell. This is the most excited I have been for something in a long time. If you see me at the Symposium and have any questions don’t hesitate to ask. When you get a chance also check out SitecoreGabes take on Chicago here.

Getting Started Quickly with #Sitecore CDP (Customer Data Platform)

Sitecore CDP formerly Boxever is something you are probably hearing a lot about these days. As a developer you can implement it easily and as a marketer you can take advantage of some of the features as soon as it is implemented. Here are the steps in order I did to get started.

1. Get a sandbox account.

Should be able to get a login for the CDB Sandbox from your Sitecore rep. You can find the sandbox site here. This is a shared sandbox so you will need to be careful not to change anything that someone else has setup. It is ok to look and see what others have setup. That is one advantage of a shared sandbox.

When you first login to your sandbox account you should see a message like this:

2. Get your keys and Create Point of Sale Value.

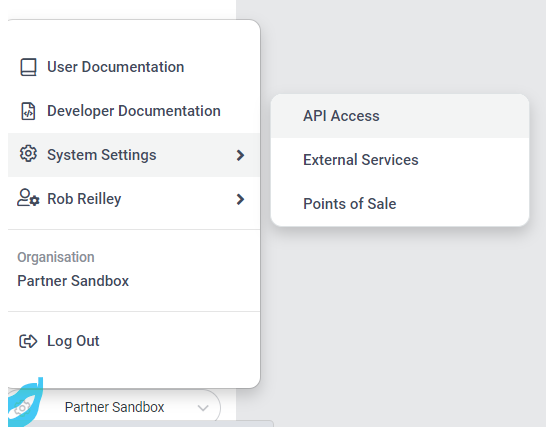
To get your keys go to the gear icon at the bottom left and select System Settings then API Access.

Copy both keys. Please note in my example I did not use the API Token.

3. Create Point of Sale

Selected System Setting then Point of Sale. Click on the create button and fill out the required fields. In my case since I am using the Lighthouse Demo I called my POS LighthousePOS. Well I can’t remember if I created or it was already out there.

4. Implement code. (SXA Example)

The next step is to implement the script needed to integrate CDP with your site. The script should look like the following. As of this blog the target version should be 1.2 and s.src should be 1.4.8. You will need to add your client key.

// Define the Boxever queue
   var _boxeverq = _boxeverq || [];
   // Define the Boxever settings
   var _boxever_settings = {
       client_key: 'client key goes here', // Replace with your client key
       target: 'https://api.boxever.com/v1.2', // Replace with your API target endpoint specific to your data center region
       cookie_domain: '.lighthouse.localhost', // Replace with the top level cookie domain of the website that is being integrated e.g ".example.com" and not "www.example.com"
       pointOfSale: "LighthousePOS",
       web_flow_target: "https://d35vb5cccm4xzp.cloudfront.net"
};
   // Import the Boxever library asynchronously
   (function() {
        var s = document.createElement('script'); s.type = 'text/javascript'; s.async = true;
        s.src = 'https://d1mj578wat5n4o.cloudfront.net/boxever-1.4.8.min.js';
        var x = document.getElementsByTagName('script')[0]; x.parentNode.insertBefore(s, x);
    })();

I kept this pretty simple and for now created a script and put it under the Base Themes\Main Theme\Scripts folder. I created a script item called cdp-script.

5. Create an Experiment

From the menu expand Experiments and choose Web. Click on the Create Experiment button.

From there you want to click on the add variant button.

After you click on Add Variant there will be a side menu that will appear. Choose My Library Templates.

We will choose a simple popup takeover.

Change anything you want to. In this case I changed the background and font colors. You can also change HTML and script

Once done, make sure you click on the Save button then Close when you see the checkmark.

You will see the new Popup in a list. Click on the Preview button, enter in your site with the CDP script and click the go button. If everything worked correctly you should see the popup.

Once the site opens, in this case my local demo site you will see the popup created.

Another option to try is Experiences the setup is similar to Experiments. You can find on the same menu as Experiments.

This should get you started. I would take a look at what others have done since it is a public sandbox. There are a lot of possibilities with CDP and we are only scratching the surface. For more information on getting started please take a look at this video that was released as I was putting together this blog.

#Sitecore Lucene to SOLR Index Upgrade Tips

Recently I did a Lucene to SOLR upgrade. Even though SOLR has been out a while you may still run into instances that you may need to upgrade. This I hope gives you a small guide on some of the things you need to do other than installing the SOLR server.

1. Turn on switch and rebuild on indexes. You can find more information about that here. Don’t forget to add your custom indexes as well.

2. Convert string to string[]. I ran into an issue where a field was coming back with a null. Looking at the SOLR server and doing a query I found that the following would come back as null.

["27ae232e906349b083d612f2ebb7a173", "3fd1ef6aac954936bb8133d5f60ebfee", "9b8e4140b9fe4ecb99c41e0454b31b2e"]

Looking at it further found that the following code needed to be changed.

From:
  [IndexField("tags")]
  public string Tags { get; set; }
To:
  [IndexField("tags")]
  public string[] Tags { get; set; }

Basically the string needed to be a string array.

3. Make sure you check the class references.

From:
Sitecore.ContentSearch.LuceneProvider.LuceneSearchIndex, Sitecore.ContentSearch.LuceneProvider
To:
Sitecore.ContentSearch.SolrProvider.SolrSearchIndex, Sitecore.ContentSearch.SolrProvider

4. Don’t forget to rebuild the indexes and make sure everything you expect is there.

On a side not every time I hear SOLR I think of this movie.

#Sitecore Hackathon 2022 Adventure. #SCHackathon

Six years doing the Sitecore Hackathon and one thing I learned is each year brings a new challenge. First off I had a great team. Our team name was R-Bacon-Sulting. I worked with two co-workers from RBA. One being a front-end developer and the other being Devops. All we needed was a project manager and a business analyst to complete the team. We chose the third category for the hackathon which was to make an enhancement to the MVP site.

As hard as we tried the goal of adding to the MVP site did not work out since we had trouble getting the site up and running and ran out of time. We did have a great idea and hope to one day we can implement it.

The bottom line is we all learned something and as co-workers we got to know each other better. In the end isn’t this what this mainly is about?

So here we go with the summary of what I learned this year (in Ted Lasso speak) because let’s face it there is always room for improvement. That is why I love what I do.

Under pressure is when we learn that we really have what it takes. We may be in unfamiliar territory, but we adapt and get better because of it.
So many things happen when you don’t succeed. Life is full of surprises. We just have to go with the flow and hope for the best as we learn. Even if it is not the fairy tale you want it is the fairy tale that is best for you to grow professionally.
Yeah I love to code, but you know what else I love to do? I love to teach people about coding. What you learn is always crucial to pass it on to others. Glad I got the opportunity to pass on some Sitecore things to the team and I also learned things from them.
Everyone that participated in the Hackathon will remember the good and the bad. You know what though, next year we need to be a goldfish and approach it like it is something new and exciting. Forget about what went wrong, but focus on the task at hand.
Special shout out to all that put on the Sitecore Hackathon every year and our team from RBA.

#Sitecore #Docker Containers Syncing Database Changes the Lazy Way

I have been using Docker/Containers for about six months. I have to tell you I really like using them. A recent project I am helping architect the solution for I decided to have the other developers use them. There were some hiccups along the way getting some developers setup, but so far it has worked out well. I think I convinced them change is good.

Ted Lasso Memes At Your Service!

Anyway one of the things I have learned is how easy it is to deploy things to containers. One of them being databases. Normally you would install Sitecore and serialize items or use Sitecore packages for changes. We are doing that. However we had multiple sites/tenants to create in SXA and wanted to make sure the team was in sync from the start. With the out of the box Sitecore tools for Docker it is easy to do.

If you look into your docker\data\mssql folder (could be a different folder depending how you setup your volume, but in this case I am using the default) you will find the ldf and mdf files for each Sitecore database. Just copy the ones for the database you want to share and put it in a shared folder for other developers. I actually stored them in Teams.

The developer who is installing the database should do a docker-compose down first. Then copy the database files to their local data\mssql folder. Once they are a copied to the other developer’s local data\mssql folder they will need to do a docker-compose up. Now they will have the same database changes as the other developer for their containerized Sitecore instance. BTW inside the mssql image you can view the database files.

So what happened? Was it magic? Well if you think PowerShell is magic then it was. As with custom web changes databases are also deployed into the images using the built in Sitecore tools. So as soon as the files are copied the watcher does its thing.

So one catch with this that I noticed recently. If you clean out your Docker Data\Deploy folders by running something like the clean.ps1 script it clears out the data\mssql folder. Which means the database changes could be lost. I will look for a workaround for this, but one thing that I did was create a clean script that keeps the database folder contents. See below for an example:

# Clean data folders
Get-ChildItem -Path (Join-Path $PSScriptRoot "\docker\data") -Directory | ForEach-Object {
    $dataPath = $_.FullName

    Get-ChildItem -Path $dataPath -Exclude ".gitkeep", "license.xml", "*.ldf", "*.mdf" -Recurse | Remove-Item -Force -Recurse -Verbose
}

# Clean deploy folders
Get-ChildItem -Path (Join-Path $PSScriptRoot "\docker\deploy") -Directory | ForEach-Object {
    $deployPath = $_.FullName

    Get-ChildItem -Path $deployPath -Exclude ".gitkeep", "license.xml", "*.ldf", "*.mdf" -Recurse | Remove-Item -Force -Recurse -Verbose
}

I will update this blog post I am sure as things evolve with Docker/Containers, but I hope for now this will give one way to share database changes. If you have a better way I would love to know.

#Sitecore Milwaukee In Person Meetup Impressions and Pictures

My favorite Sitecore meetup has been the Milwaukee since I attended my first one. After a long time off a new one was going to be put on by Mike Congdon and Joe Ouimlet. It would take place at Milwaukee Tool. I asked them if they needed a presenter and was honored to be picked. They even got me a six pack of Spotted Cow for speaking. It was worth the 2+ hour drive just for that. 🙂 You can find the full video of the meetup here.

The first speaker was Geoff Morgeene from Milwaukee Tool. Geoff shared tricks and gotchas from using the Sitecore Powershell extension. I learned a lot on his presentation and will definitely use his ideas.

Geoff Morgeene presenting.

The second speaker was me, talking about using Content Hub and webmethods.io. You can check out a few videos on YouTube of me presenting this. If you would like me to present at your meetup let me know.

Look at all those awesome tools.
Joe getting things ready.

Looking forward to the next one.

Extending the BizFX Commerce Tools for #Sitecore Commerce for Simpletons

Sitecore commerce has some really great features and hidden gems. Recently I was given an assignment to create some custom forms for the BizFX tools that come with Sitecore commerce. Excited as I was to get started I found there was not too much documentation on this. I had some help thanks to Andrew Sutherlands blog. There were things though that I ran in to that I had to figure out how to get through. So I want to make sure I can help others who may get into the same situation as me and also if I ever need to to extend the tools again I can look back at this blog and it will help me figure some of the things out.

Understanding the Master Form and Children

Basically you have a master view. This is usually a summary of your records. Clicking on that master form will show its children views. The children could be any type of detail block of information. So lets say you have a summary of services as your master. The children view when breaking it down further could be notes and description, service dates, vendor information etc… The code below is an example on how to add children view(s) to a master view. You need to make sure you are on the correct master view.

[PipelineDisplayName(Constants.Blocks.GetServicesItemsBlock)]
    public class GetServicesItemsBlock : GetTableViewBlock
    {
        private readonly IServiceService _servicesService;

        public GetServicesItemsBlock(IServiceService servicesService)
        {
            _servicesService = servicesService;
        }

        public override Task<EntityView> Run(EntityView entityView, CommercePipelineExecutionContext context)
        {
            Condition.Requires(entityView).IsNotNull($"{this.Name}: The argument can not be null");

            var entityViewArgument = context.CommerceContext.GetObjects<EntityViewArgument>().FirstOrDefault();
            if (entityViewArgument == null || string.IsNullOrEmpty(entityViewArgument.EntityId)) return Task.FromResult(entityView);

            if (!EntityViewExtensions.IsOnServicesView(entityViewArgument)) //Make sure you are on the correct master view
            {
                return Task.FromResult(entityView);
            }
            
            var entityId = long.Parse(entityViewArgument.EntityId.Substring(entityViewArgument.EntityId.LastIndexOf('-') + 1));
            var services =  _servicesService.GetServiceById(entityId);

            EntityView subView = new EntityView
            {
                EntityId = entityId.ToString(), Name = Constants.Headers.Items, UiHint = "Table"
            };

            entityView.ChildViews.Add(subView);

            var servicesItemList = services.Result.ServiceItems;
            if (servicesItemList == null) return Task.FromResult(entityView);

            foreach (var subitem in servicesItemList)
            {
                EntityView lineView = new EntityView
                {
                    EntityId = subView.EntityId, ItemId = services.Result.OrderId, Name = Constants.Headers.Items
                };

                lineView.AddServiceItemChildView(subitem);
                subView.ChildViews.Add(lineView);
            }

            return Task.FromResult(entityView);
        }
    }

For the master you will have code like this if you need to change the properties:

//Current entity which is the the master view is passed in to the block.
public override async Task<EntityView> Run(EntityView arg, CommercePipelineExecutionContext context)

var status = entityViewArgument.ViewName.Replace("ServicesList-", string.Empty);
            arg.Properties.Add(new ViewProperty
            {
                Name = "ListName",
                RawValue = status,
                IsReadOnly = true,
                IsHidden = true,
                IsRequired = false
            });
            arg.UiHint = "Table";
Example Summary

To sum it up the master/child view structure is simple. You have your master view, but then you can add children views and those children can have children views.

For the children you want to generate a new view.

It would be done in this order (see code for reference):

  1. Get the master view.
  2. Create a subview (child view).
  3. Create and add children to the subview.
  4. Add subview to the master entity view.
using System.Linq;
using System.Threading.Tasks;
using Sitecore.Commerce.Core;
using Sitecore.Commerce.EntityViews;
using Sitecore.Framework.Conditions;
using Sitecore.Framework.Pipelines;

namespace PSP.Commerce.Plugin.Service.Pipelines.Blocks
{
    ///<summary>
    ///displays the service items view in BizFx/services.
    ///</summary>
    [PipelineDisplayName(Constants.Blocks.GetServicesItemsBlock)]
    public class GetServicesItemsBlock : GetTableViewBlock
    {
        private readonly IServiceService _serviceService;

        public GetServicessItemsBlock(IServiceService serviceService)
        {
            _serviceService = serviceService;
        }

        public override Task<EntityView> Run(EntityView entityView, CommercePipelineExecutionContext context)
        {
            Condition.Requires(entityView).IsNotNull($"{this.Name}: The argument can not be null");

            var entityViewArgument = context.CommerceContext.GetObjects<EntityViewArgument>().FirstOrDefault();
            if (entityViewArgument == null || string.IsNullOrEmpty(entityViewArgument.EntityId)) return Task.FromResult(entityView);

            if (!EntityViewExtensions.IsOnSubcriptionsView(entityViewArgument))
            {
                return Task.FromResult(entityView);
            }
            
            var entityId = long.Parse(entityViewArgument.EntityId.Substring(entityViewArgument.EntityId.LastIndexOf('-') + 1));
            var service=  _serviceService.GetServiceById(entityId);

            EntityView subView = new EntityView
            {
                EntityId = entityId.ToString(), Name = Constants.Headers.Items, UiHint = "Table"
            };

            entityView.ChildViews.Add(subView);

            var serviceItemList = service.Result.ServiceItems;
            if (serviceItemList == null) return Task.FromResult(entityView);

            foreach (var subitem in serviceItemList)
            {
                EntityView lineView = new EntityView
                {
                    EntityId = subView.EntityId, ItemId = service.Result.OrderId, Name = Constants.Headers.Items
                };

                lineView.AddServiceItemChildView(subitem);
                subView.ChildViews.Add(lineView); 
            }

            return Task.FromResult(entityView);
        }
    }
}

Example child item.

There are many field types you can use for views, but two of them that stood out for me was the EntityLink and HTML field types.

Below is an example of an link type. Which we can create to navigate to other types of views. The Id for instance could be used to retrieve records for the child views.

var idViewProperty = new ViewProperty
                {
                    Name = "Id",
                    RawValue = service.Id,
                    IsReadOnly = true,
                    UiType = "EntityLink"
                };
                entityView.Properties.Add(idViewProperty);

Below is an example of using a UitType of Html to create an image column value.

  var imageLinkProperty = new ViewProperty
            {
                Name = "Image",
                RawValue =  "<a><img src="+ serviceItem.ImageUrl +" alt=" + serviceItem.Name + " width=\"50\" height=\"50\"></a>", //MediaManager.GetMediaUrl(serviceItem.ImageUrl),
                IsReadOnly = true,
                UiType = "Html"
            };
            properties.Add(imageLinkProperty);

Last thing I want to mention is action view buttons. You can easily defined them (see below).

            ActionsPolicy actionsPolicy = entityView.GetPolicy<ActionsPolicy>();
            List<EntityActionView> entityActionView = actionsPolicy.Actions;
            EntityActionView skipEntityActionView = new EntityActionView
            {
                Name = context.GetPolicy<KnownServiceCancelPolicy>().CancelService,
                DisplayName = Constants.Actions.CancelService,
                Description = Constants.Actions.CancelService,
                IsEnabled = true,
                RequiresConfirmation = true,
                EntityView = string.Empty,
                Icon = "delete"
            };
            entityActionView.Add(skipEntityActionView);

            List<EntityActionView> actions2 = actionsPolicy.Actions;
            EntityActionView cancelEntityActionView = new EntityActionView
            {
                Name = context.GetPolicy<KnownServiceSkipPolicy>().SkipService,
                DisplayName = Constants.Actions.SkipService,
                Description = Constants.Actions.SkipService,
                IsEnabled = true,
                RequiresConfirmation = true,
                EntityView = string.Empty,
                Icon = "hand_stop2"
            };
            actions2.Add(cancelEntityActionView);

Here are the results you will see in the view.

Hope this helps you if you are finding this blog. If not please contact me. Thanks.

#Sitecore Hackathon 2021 The Good and Some Bad. #SCHackathon

Hard to believe this was my fifth year doing the Sitecore Hackathon. It has become a tradition though and would not want to miss it. This year my teammate was a co-worker and we were team Alpha Centauri. Get it? We both work for Alpha Solutions. Anyway here is how it went.

Keep Things Simple

Learned this many times in the past. So anything that wasn’t out of the box was off the table. Nothing wrong with trying something new, but as a marathoner I have to stick to the important rule of not trying anything you haven’t practiced on race day.

Well I Missed Something

So I should of read this more closely. We were supposed to use Sitecore 10.1, but for some reason I installed Sitecore 10 update 1 beforehand. So guess what? I broke my own rule and just learned something new. It was McAvoy vs Stewart. Love the reskin BTW.

Some Great Topics to Choose from, but We Need a Solid Idea

This year was the fastest year my hackathon team came up with an idea. One of the topics was Best of SXA. Working with SXA everyday we had come up with a much needed change we felt is needed.

Divide and Conquer

As in past hackathons that I have worked with others, it is always good to come up with roles on the team. I would handle the documentation/video and my teammate would handle the coding. And we were off.

The Finale

After lots of time spent coding and documenting we put something together. Hardest thing for me was getting the video right. There is a reason why I am not a YouTube star. So this is what we came up with.

So that is a wrap. See you all next year!